Automation Guide for Subscription Center
- 08 Dec 2023
- 23 Minutes to read
- Contributors

- Print
- DarkLight
Automation Guide for Subscription Center
- Updated on 08 Dec 2023
- 23 Minutes to read
- Contributors
- Print
- DarkLight
Article Summary
Share feedback
Thanks for sharing your feedback!
5.49 Gateway Keyword and SMS Subscription Migration Step-by-Step Guide
This document details the steps needed for an admin to a) update Gateway records to include proper Opt-in and Opt-out keywords, and b) efficiently determine the opt-in / opt-out status of each number per gateway to fully leverage the new SMS Subscriptions feature in v5.49.14+.
Updating Gateway records with proper keywords
Prerequisites
User Permission: The steps in this document should be undertaken by a user with a system administrator profile with the Mogli Admin permission set assigned. The user should also have permission to create reports, and export results.
Data Import Wizard or data import tool of choice: The steps here are written for users of Data Import Wizard, but other data import tools can be used as long as the documented fields are included.
Determining your update method
Gateway records can be updated using one of the following three methods:
- Via listview (this is the easiest method and is appropriate for up to 200 gateway records)
- Via dataload(better option than listview when one or more of the following is true for you:
- You prefer using data loader or similar tools for mass record updates;
- You have built your own automation triggering on updates of Gateway records that you wish to skip; and/or,
- You are using custom keywords for Opt-In and Opt-Out.
- Via screenflow(better option when one or more of the following is true for you:
- You prefer using flow to make mass record changes;
- You have a large amount of gateways to edit;
- You are not using custom keywords for Opt-In and Opt-Out, or using them only for a handful of gateways.
Using Listviews to Update Gateway Keywords
Summary
This process will update (overwrite) the default opt-in and opt-out keywords to existing Twilo or Telnyx Gateways. This is useful for clients using a small number of gateways - up to 200.
- This process should be done once after upgrading to 5.49.14 to update keywords on existing Gateway records. Any Gateways added after upgrading will have opt-in/opt-out keywords inserted automatically.
- If you have custom keywords configured from before the update, take note to check those are still included after the change.
- Create a backup. Either by:
- Creating a report of all Gateway records, their record Id, Name, Record Type, Opt-In Keywords and Opt-out Keywords and exporting that.
- Use a tool of your choice to export record details with the same field information to a spreadsheet.
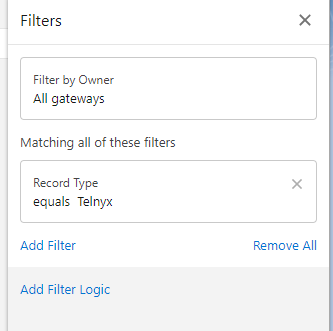
- Go to App Launcher and launch the MogliSMS Lightning app, open the Gateway Tab.
- Create a listview for Telnyx Gateways containing the following fields:
- Name the listview: Telnyx Gateway Keywords.
- Click Save
- Add the following fields: Gateway Name, Phone Number, Opt-In Keywords, Opt-out Keywords, Inactive, Record Type, Last Modified Date

- Set Filter by Record Type = “Telnyx”
- Refresh the listview. If there are no records, skip to step 7.
- Otherwise, select all and change all the Opt-In Keyword field value for multiple records by doing the steps below:
- Hover over a field in the Opt-In Keyword field, click on the pencil to see the option to update, enter Start, Unstop
- Click Update (number) selected items
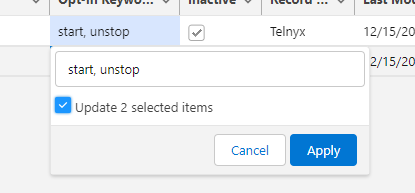
- Click Apply. All the selected records changed.
- Change all the Opt-Out Keyword field value for multiple records by doing the steps below:
- Hover over a field in the Opt-Out Keyword field, click on the pencil to see the option to update, enter stop, stopall, stop all, unsubscribe, cancel, end, quit
- Click Update (number) selected items.
- Click Apply. All the selected records changed.
- Create a listview for Twilio Gateways containing the following fields, and it is easiest if you simply clone the Telnyx Listivew from above:
- Name the listview: Twilio Gateway Keywords.
- Click Save
- Add the following fields: Gateway Name, Phone Number, Opt-In Keywords, Opt-out Keywords, Inactive, Record Type, Last Modified Date
- Set Filter by Record Type = “Twilio”
- Refresh the listview. If there are no records, you can skip to step 10. Otherwise, select all and change all the Opt-In Keyword field value for multiple records by doing the step in 5 above. The keywords should be: start, yes, unstop
- Select all and change all the Opt-Out Keyword field value for multiple records by doing the step in 6 above. The keywords should be: cancel, end, quit, unsubscribe, stop, stopall
- Compare a new report of all Gateway records with backup to review your work.


Export, Update then Re-import Gateway records to update Keywords
These steps will update (overwrite) the default opt-in and opt-out keywords to existing Twilo or Telnyx Gateways. While the steps here are more involved than the list view method, it is usually the better option when one or more of the following is true for you:
- You prefer using data loader or similar tools for mass record updates;
- You have built your own automation triggering on updates of Gateway records that you wish to skip; and/or,
- You are using custom keywords for Opt-In and Opt-Out.
- This will need to be run once after upgrading to 5.49.14 to update keywords on existing Gateway records. Any Gateways added after upgrading will have opt-in/opt-out keywords inserted automatically.
- If you have custom keywords configured from before the update, take care when updating the keywords to include those as you work through the steps below.
- Create a backup of the Telnyx and Twilio Gateway records. Either by:
- Creating a report of all Gateway records, with the following fields: Record Id, Gateway Name, Record Type, Opt-In Keywords and Opt-out Keywords and exporting that.
- Exporting record details with the same field information to a spreadsheet.
- Save a copy of the spreadsheet - label it so you know this is the working file with updated information you want to import. At this point you should have three identical files. You should only make edits to the working file for safety.
- Sort your spreadsheet by Record Type. IMPORTANT: you should prepare the spreadsheets for Twilio and Telnyx separately.
- For rows where the Record Type = “Twilio”:
- Update the Opt-In keywords to be: start, yes, unstop
- Update the Opt-Out keywords to be: cancel, end, quit, unsubscribe, stop, stopall
- NOTE: Again, if you have your own special keywords used in the past, you should make sure those are included. For example if you were using the word “Join” to Opt In then the keywords should be: start, yes, unstop, join,
- For rows where the Record Type = “Telnyx”:
- Update the Opt-In keywords to be: start, unstop
- Update the Opt-Out keywords to be: stop, stopall, stop all, unsubscribe, cancel, end, quit
- Check your work on this spreadsheet, Save as CSV file type. This list is now ready to be used to update Gateway records (Mogli_SMS__Gateway__c) using Data Import Wizards or your favorite tool.
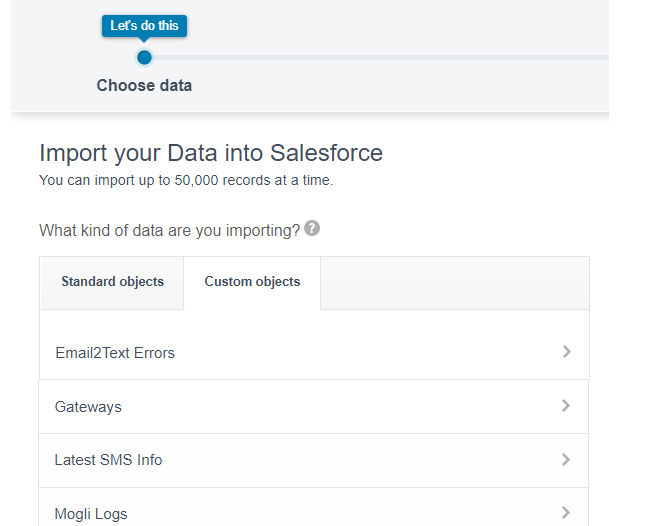
- Go to Setup > Integrations > Data Import Wizard
- Click Launch Wizard!
- At Choose Data, do the following:
- Click the Custom Objects tab under “What kind of data are you importing?”
- Select Gateways
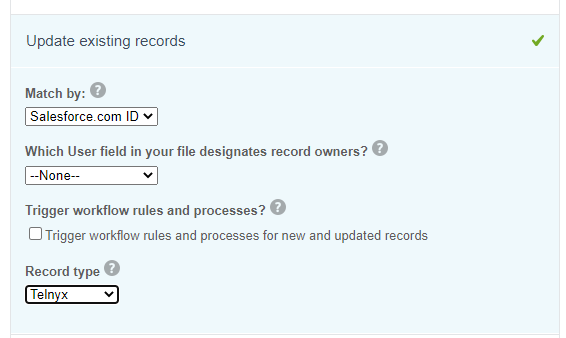
- Select “Update existing records”.
- Set Match by: Salesforce.com ID
- Set Which User field in your file designates record owners? –None–
- Set Trigger workflow rules and processes? to unchecked
- Set Record Type to Telnyx OR Twilio depending which csv you are updating.
- Drag the CSV file from your folder to the area shown to upload

- Set the Character Code to Unicode (UTF8) and Values Separated By to Comma.
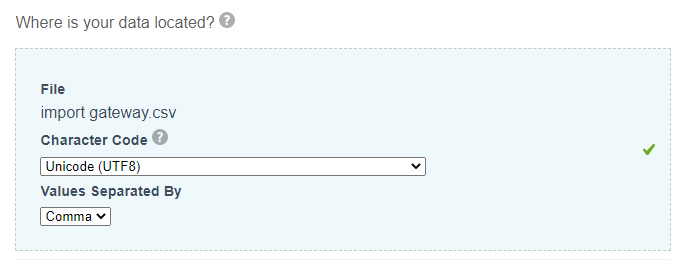
- Click Next
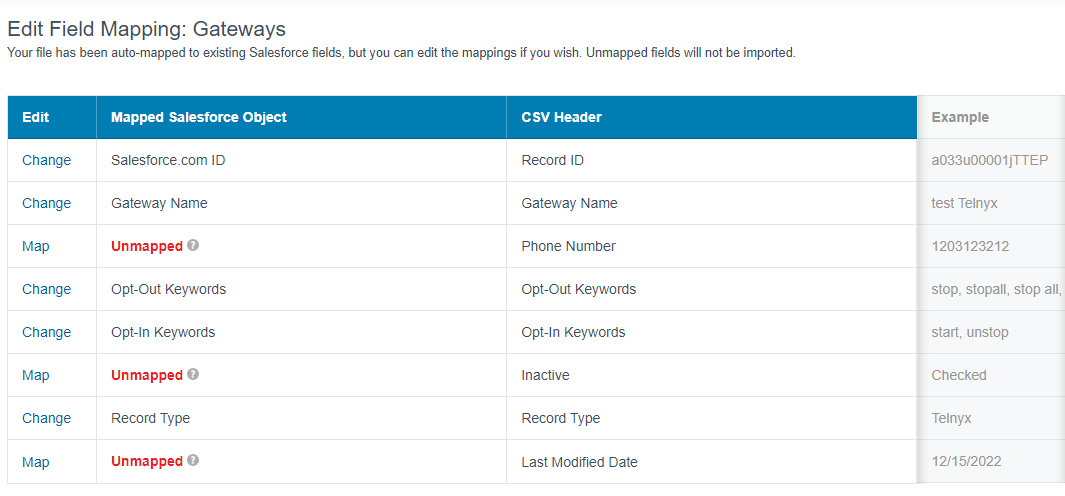
- Map the fields as shown below. The only fields that need to be mapped are the Record ID, Gateway Name, Opt-Out Keywords, Opt-In Keyworks and Record Type. (See below) If some fields are missing, check if you have the Mogli SMS User: System Admin permission set assigned.
- Click Next.
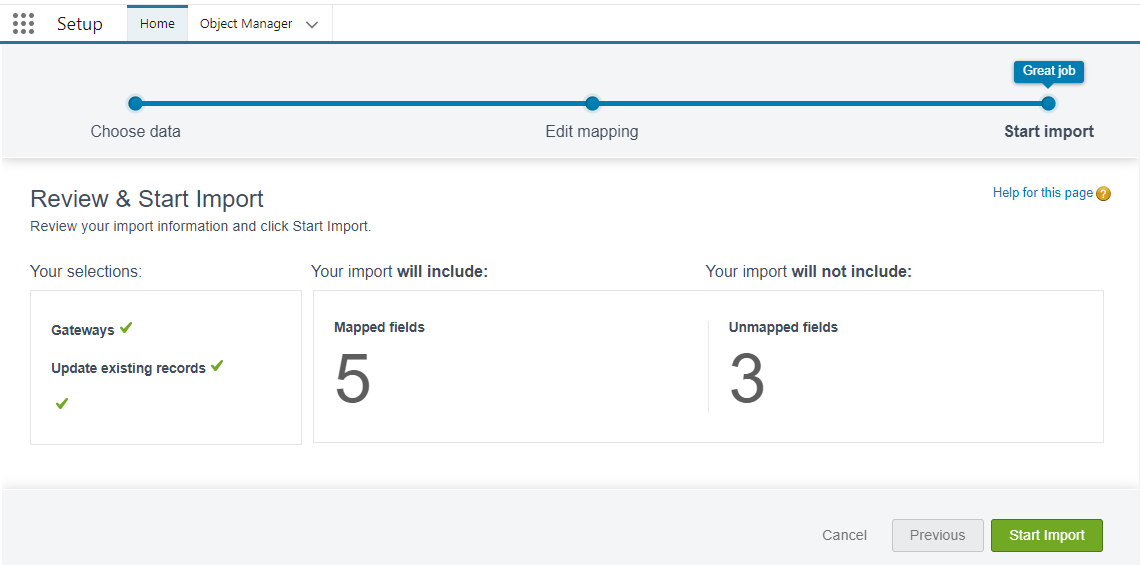
- At the Review and Start Import screen, check the values one more time. Then click Start Import when ready.
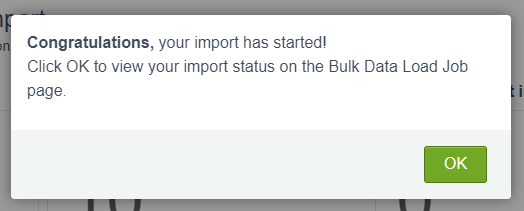
- You should see the message below, click OK.
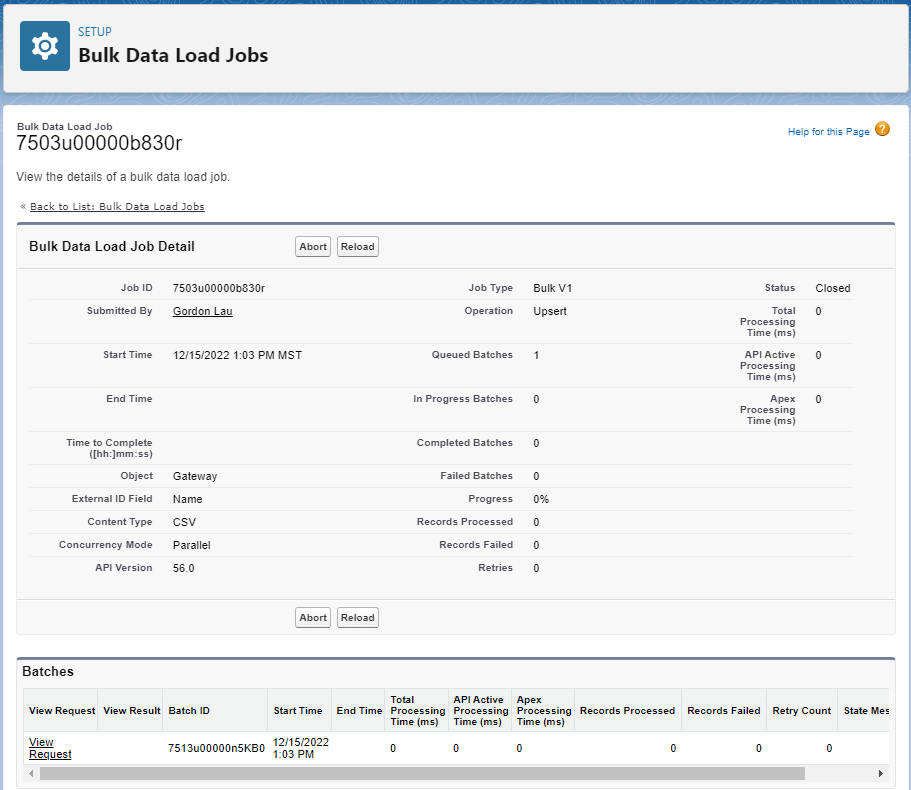
- Review the result. If there are any Records Failed, then click View Result under Batches to see what the problem is.
- Repeat again with the other file, starting at step 7. Making sure that you correctly set the Record Type in Step 9.7.


Create and Run a Screen Flow to Update Gateway Keywords
This automation will update (overwrite) the default opt-in and opt-out keywords to existing Twilo or Telnyx Gateways. While the steps here are more involved than both the list view and the export/edit/re-import method, it is usually the better option when one or more of the following is true for you:
- You prefer using flow to make mass record changes;
- You have a large amount of gateways to edit;
- You are not using custom keywords for Opt-In and Opt-Out, or using them only for a handful of gateways.
- This will need to be run once after upgrading to 5.49.14 to update keywords on existing Gateway records. Any Gateways added after upgrading will have opt-in/opt-out keywords inserted automatically.
- If you have custom keywords configured from before the update, they will need to add those manually AFTER running the automation. Therefore, please make sure to perform a backup export of the gateway record data beforehand.
- Create a backup. Either by:
- Creating a report of all Gateway records, their record Id, Name, Record Type, Opt-In Keywords and Opt-out Keywords and exporting that
- Exporting record details with the same field information to a spreadsheet.
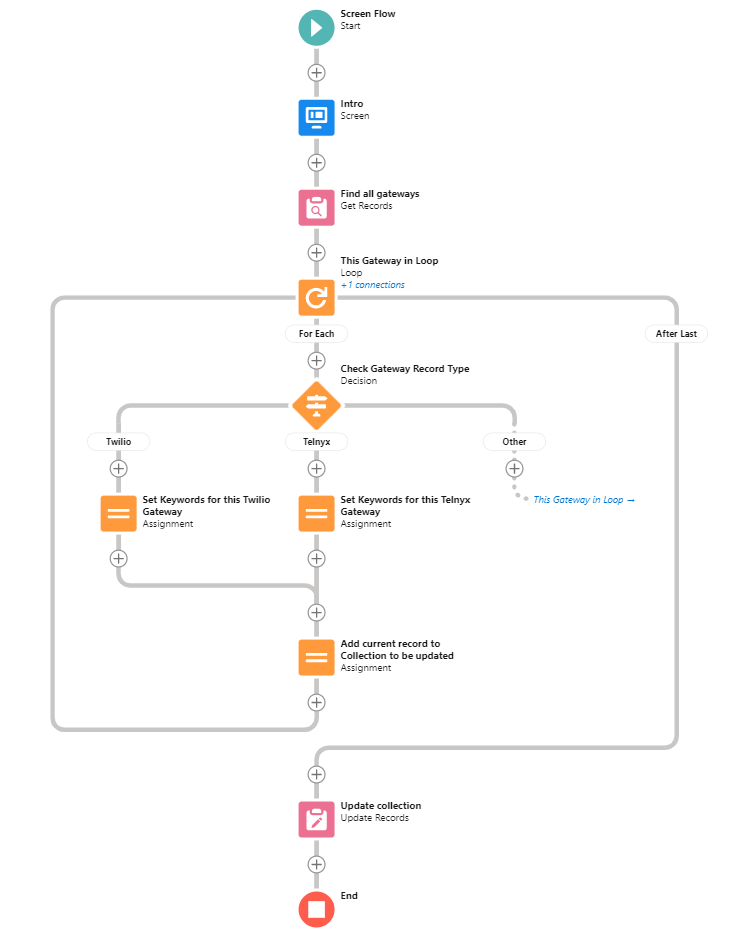
- Create a screen flow with the flowing elements
- Go to Setup > Flow > New Flow
- Choose Screen Flow
- Save the screen flow to retain your progress
- Click Save
- Flow Label: Update Gateway Keywords screen flow (or any name of your choice)
- Description: This flow will automatically overwrite the Opt-In Keywords and Opt-Out Keywords of Twilio and Telnyx gateways.
- Click Save
- Continue to build the flow by adding the elements and resources below, saving as often as you like to retain progress.
- Start Building the Screenflow - Add a Screen Element
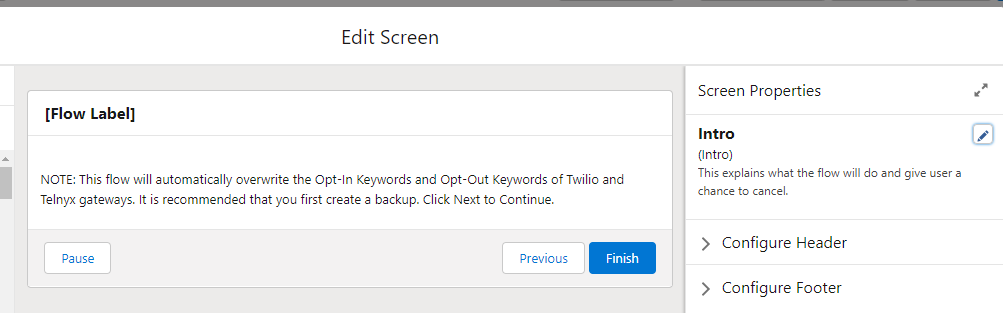
- Label: Intro
- Description: This explains what the flow will do and give user a chance to cancel.
- Drag to Add Display Text component to this screen Element
- API Name: Introtext
- Text area: NOTE: This flow will automatically overwrite the Opt-In Keywords and Opt-Out Keywords of Twilio and Telnyx gateways. It is recommended that you first create a backup. Click Next to Continue.
- Click Done
- Add a Get Record Element (after the screen element above)
- Label: Find all gateways
- Description: Find all gateways
- Object: Gateway (Mogli_SMS__Gateway__c)
- Filter Gateway Records:
- Condition Requirements: None–Get All Gateway Records
- Sort Gateway Records:
- Sort Order: Not Sorted
- How Many Records to Store: All Records
- How to Store Record Data: Automatically store all fields
- Sort Order: Not Sorted
- Click Done
- Add a New Loop Element (after the Get Record element above)
- Label: This Gateway in Loop
- Description: This loops through all Gateways found in org
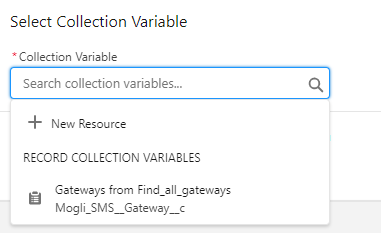
- Select Collection Variable: Gateway from Find_all_gateways (Mogli_SMS__Gateway__c)
- Direction: First item to last item
- Click Done
- Add a New Decision Element (FOR EACH)
- Label: Check Gateway Record Type
- Description: Determine if the Gateway is Telnyx, Twilio or Other
- Create outcome “Twilio”
- Label: Twilio
- Conditions Requirements to Execute Outcome: All Conditions Are Met (AND)
- Condition 1:
- Resource: {!This_Gateway_in_Loop.RecordType.Name}
- Operator: Equals
- Value: Twilio
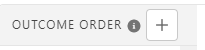
- Click the “+” next to Outcome order
- Create outcome “Telnyx”
- Label: Telnyx
- Conditions Requirements to Execute Outcome: All Conditions Are Met (AND)
- Condition 1:
- Resource: {!This_Gateway_in_Loop.RecordType.Name}
- Operator: Equals
- Value: Telnyx
- Edit Default outcome name into “Other”
- Check if you have three outcomes as shown

- Click Done
- Create a Resource (Record Collection Variable) to hold all the gateway records to be updated
- Click New Resource on the left (you might need to expand panel and select the manager tab to see this button)
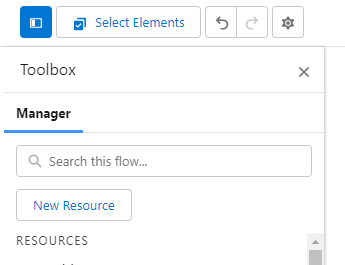
- Click New Resource on the left (you might need to expand panel and select the manager tab to see this button)
- Select Variableand Set values to the following:
- API Name: Gateways_to_update
- Description: This collection variable holds the gateways with new opt-in/opt-out keywords
- Date Type: Record
- Check Allow multiple values (collection)
- Object: Gateway
- Click Done.
- Create an assignment step for the Twilio branch
- Set values to the following:
- Label: Set Keywords for this Twilio Gateway
- Description: Assign Opt-in and Opt-out keywords for the Twilio gateway in this iteration of the loop
- Set values to the following:
- Click Add Assignment and Set Variable Values for Opt-in Keywords:
- Variable: {!This_Gateway_in_Loop.Mogli_SMS__Opt_In_Keywords__c}
- Operator: Equals
- Value: start, yes, unstop
- Click Add Assignment and Set Variable Values for Opt-out Keywords:
- Variable: {!This_Gateway_in_Loop.Mogli_SMS__Opt_Out_Keywords__c}
- Operator: Equals
- Value: cancel, end, quit, unsubscribe, stop, stopall
- Click Done
- Start Building the Screenflow - Add a Screen Element
- Create an assignment step for the Telnyx branch
- Set values to the following:
- Label: Set Keywords for this Telnyx Gateway
- Description: Assign Opt-in and Opt-out keywords for the Telnyx gateway in this iteration of the loop
- Set Variable Values for Opt-in Keywords:
- Variable: {!This_Gateway_in_Loop.Mogli_SMS__Opt_In_Keywords__c}
- Operator: Equals
- Value:start, unstop
- Set Variable Values for Opt-out Keywords:
- Variable: {!This_Gateway_in_Loop.Mogli_SMS__Opt_Out_Keywords__c}
- Operator: Equals
- Value:stop, stopall, stop all, unsubscribe, cancel, end, quit
- Click Done
- Set values to the following:
- Create an assignment step (leading from both the Telnyx and Twillo branch) to add the record to the record collection variable.
- Set values to the following:
- Label: Add current record to Collection to be updated
- Description: Add this Telnyx and Twilio gateway to the record collection variable
- Set Variable Values for Opt-in Keywords:
- Variable: {!Gateways_to_update}
- Operator: Add
- Value: {!This_Gateway_in_Loop}
- Click Done
- Set values to the following:
- Create an Update Record step (after the loop has ended) to update all the Twilio and Telnyx gateways found.
- Set values to the following:
- Label: Update collection
- Description: This update the "Gateways to update" collection of gateway records
- How to Find Records to Update and Set Their Values: Use the IDs and all field values from a record or record collection
- Record or Record Collection: {!Gateways_to_update}
- Click Done
- Set values to the following:
- Save the flow
- It should look like this in Auto-Layout Mode
- Run the flow by clicking Run.
- After the flow is complete, run a report again to verify the Opt-In and Opt-Out Keywords have been updated according to the type of Gateway.
- Edit any Gateway records with the custom Opt-In and Opt-out Keywords manually as necessary, using your backup from Step 1 as reference.
- After you are satisfied with the Gateway Opt-In and Opt-Out keywords, you can deactivate or delete the flow.


SMS Subscription Migration
This set of instructions will help you compile and upload the information needed to populate the initial records needed for the SMS Subscription feature. This involves creating new fields on the SMS object, creating reports, exporting the results, and then preparing the data for upload back into Salesforce.
- The desired endstate is that for every SMS record with an opt-out keyword, we insert/update the Latest SMS Info record accordingly, and account for opt-in keywords that may have been received after an opt-out keyword.
- OPTIONAL:Examine if you need to update the “Mogli Opt Out” checkbox field of Parent Records.
- This refers to records such as Contact, Leads, Opportunities, or any other Mogli-integrated objects. Those integrated objects would have a checkbox field called “Mogli Opt Out”.
- This field acts as a global override and has priority - meaning when marked as TRUE you would not be able to use the conversation view and bulk SMS lightning tab. (For more information please refer to EXTERNAL - Release Notes - v5.49 (Winter '23))
- Therefore, if you have used this Mogli Opt Out field in the past to handle gateway level opt-out, we recommend that you review your records and determine if you should change that field from TRUE to FALSE (unchecked). Another scenario where you might want to make this change is when in the past you only had one gateway and are now adding more.
- In the procedures below, please note the steps marked OPTIONAL in Step 8, Step 17, and Step 33 for our recommendations.
- Due to the limitation of the object structure, specifically that the Message field (Mogli_SMS__Message__c) on the SMS object is of the type Long Text Area, it is NOT possible to filter past messages for the desired keywords in a Get Record element in flow, nor is it possible to use SOQL query to isolate the records you need.
- Using SOSL would help narrow down the records, but because it does not support exact match, additional steps to filter record-by-record in your automation will still be needed.
- If you have automation that triggers when certain records are changed, be sure to consider those impacts first and turn off the automation as necessary or if using Data Import Wizard, uncheck “Trigger workflow rules for created or updated records.”
- This process only updates records when an opt-out keyword is used. If there are record-level opt-outs that did not occur via an opt-out keyword (such as those communicated to you via email), those record-level opt-outs will remain in place, requiring another manual process to make sure it is flagged properly.
- This process does not handle any opt-in data migration if you are using Mandatory Opt-In (Application Settings.Mandatory Opt-In = TRUE).
- This process does not handle any data migration from other SMS applications (such as SMS Magic).
- Reference SMS Subscription Data Import Template (Latest SMS Info) if needed for migration from another SMS application.
- Go to Setup > Object Manager
- Select the object SMS (API Name: Mogli_SMS__SMS__c)
- Click on Fields & Relationships > Newto create a New field called Gateway ID. This will help in the report later.
- Select Formula, then click Next.
- Field Label: Gateway ID
- Field Name: Gateway_ID
- Formula Return Type: Text
- Click Next
- In the formula field, enter
CASESAFEID( Mogli_SMS__Gateway__r.Id ) - Description: This returns the 18-char ID for the Gateway this message went through.
- Blank Field Handling: Treat blank fields as blanks.
- Click Next
- Add to any profile you wish, at the minimum it should be System Administrator and any profile you are using.
- Click Next
- Click Save. (No need to add to page layout unless you wish to.)
- Click on Fields & Relationships > Newto create a New field called Number Gateway Ext ID. This will help in the report later.
- Select Formula, then click Next.
- Field Label: Number Gateway Ext ID
- Field Name: Number_Gateway_Ext_ID
- Formula Return Type: Text
- Click Next
- In the formula field, enter
Mogli_SMS__Phone_Number__c & " - " & Gateway_ID__c - Description: This returns Mogli Number concatenated with the 18-char ID for the Gateway this message went through.
- Blank Field Handling: Treat blank fields as blanks.
- Click Next
- Add to any profile you wish, at the minimum it should be System Administrator and any profile you are using.
- Click Next
- Click Save. (No need to add to page layout unless you wish to.)
- Click on the App Launcher and type Reports to open the Reports tab.
- Create a new report on the SMS Object to
- Click on New Report, then click on All under Category
- Choose SMS and click Start Report
- Ensure the Filtersare set to the following
- Show me: All sms
- Created date (or another date field): All Time
- Direction: equals Incoming
- Message: equals start, yes, unstop, stop, stopall, stop all, unsubscribe, cancel, end, quit
- NOTE: If you allowed for other keywords to act as Opt-In and Opt-Out, include it in the above.
- NOTE: this filter works in Reports because salesforce allows for the first 255 characters of a Long Text Area field to be filtered.
- On the Outline level, Group Rows using the Number Gateway Ext ID field.
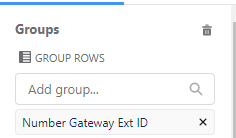
- Sort it in ASCENDING order.

- Sort it in ASCENDING order.
- Add the following fields in Columns
- Phone: Number
- Gateway ID
- Gateway
- Message
- Direction
- Send Date
- OPTIONAL STEP (please check ‘Considerations’ above to see if it applies): If you need to uncheck Mogli Opt-out field on a parent record, add field(s) for the record IDs related contacts or other parent records such as leads, opportunities, or any custom objects. (NOTE: this might require you to edit your report type or create a new one, please consult Salesforce documentation on how to accomplish this.)
- Sort Send Date to be Descending (Recent dates on top).
- If the boxes for Subtotals and Grand Total are set to true, set them to false:

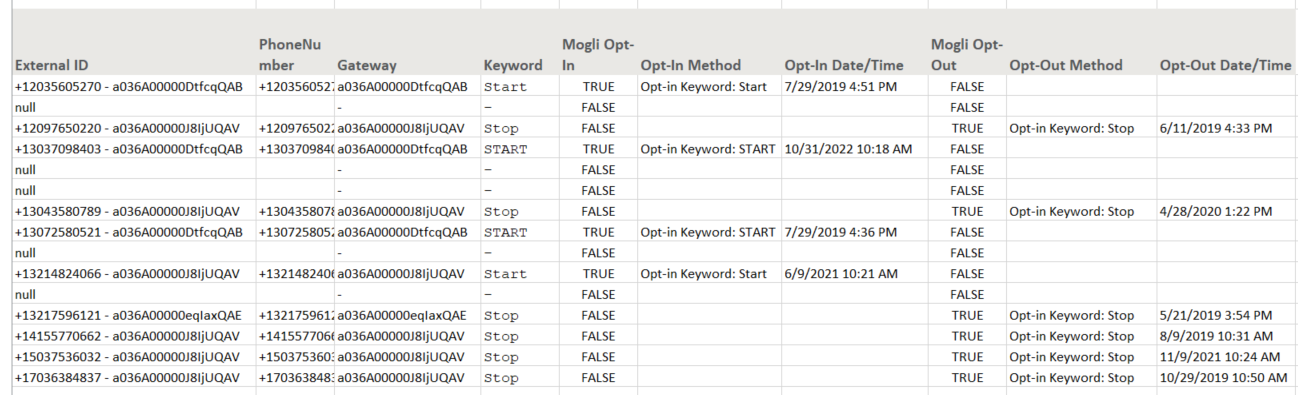
- Save and Run the report. If done correctly, you should see results similar to this. Note that for each Number / Gateway combination, you can see the last message matching the Keyword, and that is how you can determine the most recent intent of the recipient.
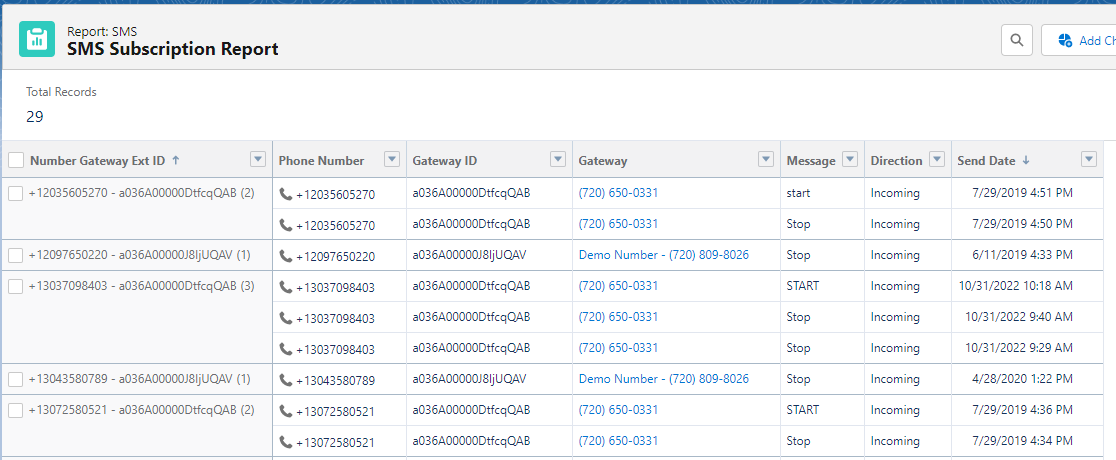
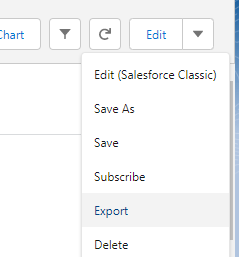
- Click Export
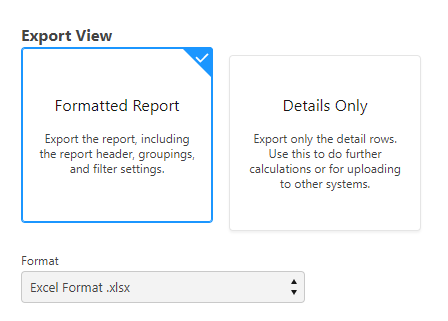
- Select Formatted Report (only Excel Format .xlsx is available, Click Export
- Wait for the download to complete and open the downloaded file in Microsoft Excel. It should appear as below. Do not make any adjustments yet, as it is very important to maintain the sorting. The gaps are critical because that is what allows the following formulas to function.
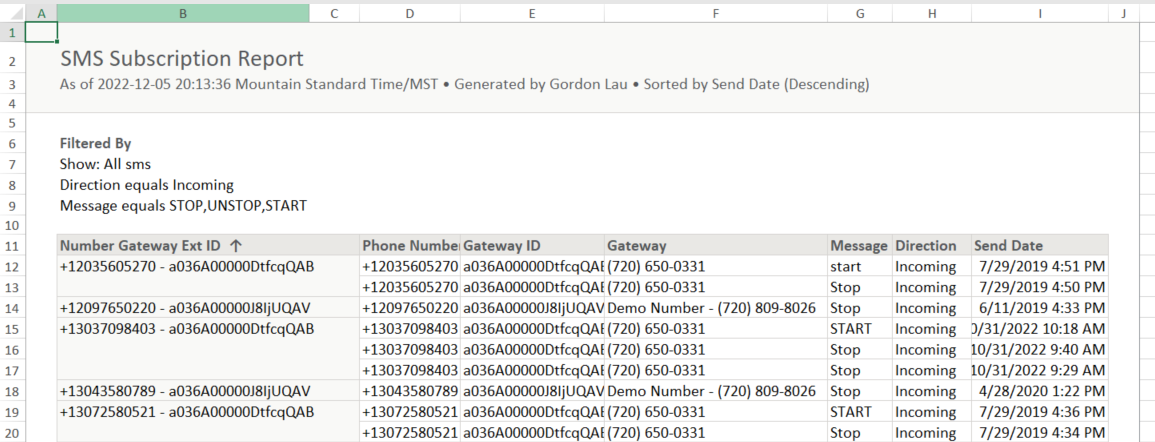
- In the columns to the right of the table, prepare the following headings. NOTE: The exact column will depend on the order of fields and if you have added more fields.
- External Id (Column K) = use formula:
=IF(ISBLANK(B12),"null",B12) - PhoneNumber (Column L) = use formula:
=IF(ISBLANK(B12),"-",D12) - Gateway (Column M) = use formula:
=IF(ISBLANK(B12),"-",E12) - Keyword (Column N) use formula:
=IF(ISBLANK(B12),"-",G12)
- External Id (Column K) = use formula:
- Add more columns using formulas, using the Keyword to determine if the message is a keyword for Opt-In or Opt-out.
- Mogli Opt-In, shows TRUE, if KEYWORD is one of the Opt-In Keywords. Use Formula:
=IF(OR(N12="start", N12="yes", N12="unstop"), TRUE, FALSE) - Opt-In Method, shows = Opt-in keyword: SMS.Message (example: Opt-In keyword: START) if Mogli Opt-In is true
=IF(O12,"Opt-in Keyword: " & N12,"") - Opt-In Date/Time = SMS.Created Date
=IF(O12,I12,"") - Mogli Opt-Out = shows TRUE, if KEYWORD is one of the Opt-out Keywords. Use Formula:
=IF(OR(N12="stop",N12="stopall",N12="stop all",N12="unsubscribe",N12="cancel",N12="end",N12="quit"), TRUE, FALSE) - Opt-Out Method, shows = Opt-Out keyword: SMS.Message (example: Opt-out keyword: STOP) if Mogli Opt-Out is true
=IF(R12,"Opt-in Keyword: " & N12,"") - Opt-Out Date/Time = SMS.Created Date
=IF(R12,I12,"")
- Mogli Opt-In, shows TRUE, if KEYWORD is one of the Opt-In Keywords. Use Formula:
- OPTIONAL STEP:If you need to uncheck/update Mogli Opt Out field on a parent record:
- Add more columns to hold for the record IDs using IF statements similar to the above. (It should show the ID if the cell in Column B is not blank)
- You will also need to add a column for the “Mogli Opt out” field which should be TRUE or FALSE.
- Generally, you want to set this as FALSE because you will now use Gateway Subscription features.
- However through looking at your business processes and past communications, if you confirm someone should be opt-out of ALL Mogli messaging, keep that as TRUE.
- If you have fields that help you determine if they have Opt out entirely, then it might also be helpful to pull those into a report. Note: because Mogli Opt Out field could be checked as a result of a manual process (for example: incoming email or call withdrawing consent), a manual review might be necessary.
- Copy the row of formulas until the end of the table. It should look like this:
- Check your work, then Save it to avoid losing it.
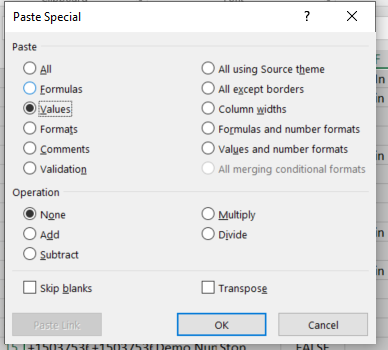
- In Microsoft Excel, create a new file for import. Click File in the menu bar, then New.
- Copy the range of Cells from Column K to Column T from the original file.
- Paste the range of Cells into the new spreadsheet. Start at cell 1A.
- Click Paste Special > Values. Click OK.
- Now sort the range by External ID, the goal is to remove the null rows (representing older keywords that we don’t need)
- Select the range of cells, then click Filter.
- Sort by External ID. The Results should look like this:

- You can now delete any rows having nulls in the External ID.
- Save the file in Comma Separated Values (.csv) format.
- NOTE: IF the file exceeds 50,000 rows, it will need to be split into separate files.
- This list is now ready to be used to upsert Latest SMS Info records (Mogli_SMS__LatestSMSInfo__c) using Data Import Wizards or your favorite tool.
- Go to Setup > Integrations > Data Import Wizard
- Click Launch Wizard!
- At Choose Data, do the following:
- Click the Custom Objects tab under “What kind of data are you importing?”
- Select Latest SMS Info

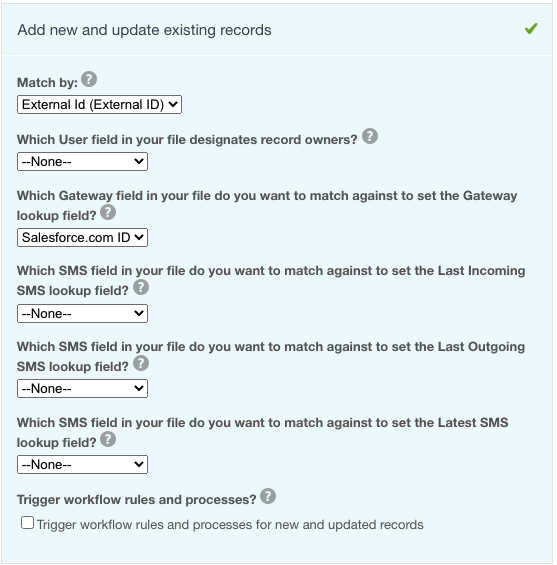
- Select “Add new and update existing records”.
- Set Match by: External ID
- Set Which User field in your file designates record owners? –None–
- Set Trigger workflow rules and processes? to unchecked
- Set Which Gateway field in your file do you want to match against to set the Gateway lookup field? To Salesforce.com ID
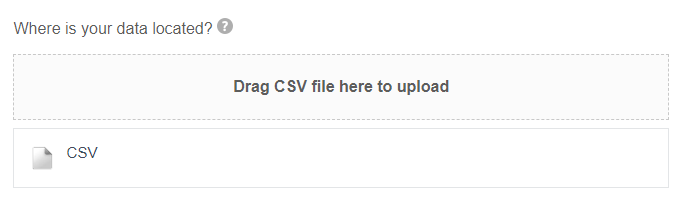
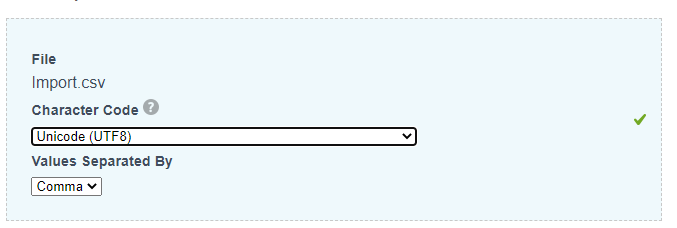
- Drag the CSV file from your folder to the area shown to upload
- Set the Character Code to Unicode (UTF8) and Values Separated By to Comma.
- Click Next
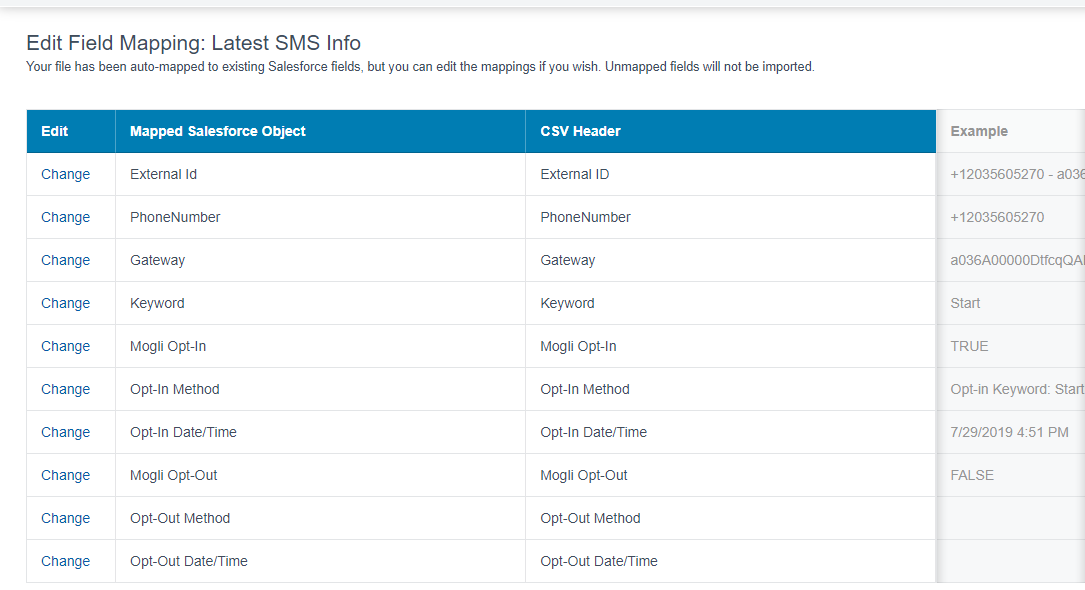
- Map the fields as shown below. (It should all automatically mapped because the column names you imputed in steps 15 and 16 matched perfectly.) If some fields are missing, check if you have the Mogli SMS User: System Admin permission set assigned.
- Click Next.
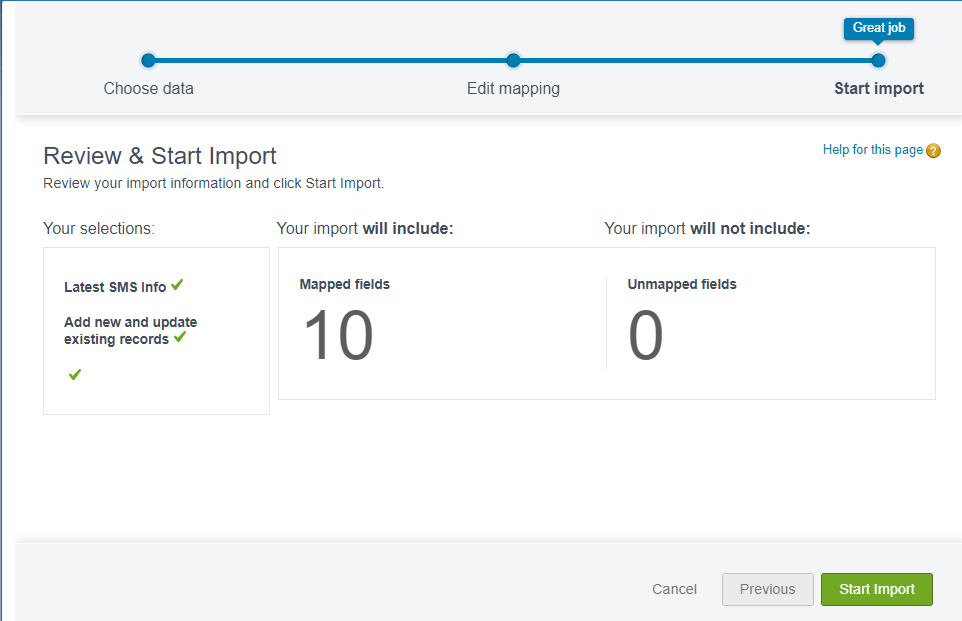
- At the Review and Start Import screen, check the values one more time. Then click Start Import when ready.
- You should see the message below, click OK.

- Review the result. If there are any Records Failed, then click View Result under Batches to see what the problem is.

- OPTIONAL STEP:If you need to update Mogli Opt Out field on a parent record:
- Using the columns you have prepared in Steps 15 to 17, prepare to update the parent record’s Mogli Opt Out field.
- Use the data loader of your choice to update Mogli Opt Out field. If you are using Salesforce Data Import Wizard in setup, refer to Steps 31 to 33.
- For example if using Data Import Wizard and you wish to update Contact, then select Standard Object > Contact and Match by: Contact ID. We recommend unchecking the Trigger workflow rules and processes to avoid triggering automations.)


Considerations for enabling SMS Subscription Migration and Automations
In versions before 5.49, many Mogli clients would activate automation to manipulate the Mogli Opt Out field. Depending on your use cases, additional changes might be needed. It is helpful to understand the Latest SMS Info field values.
- Below are fields on the Latest SMS Info object which controls the Gateway Subscription feature.
- SMS Number (Name)
- AutoNumber (non-editable)
- External Id (Mogli_SMS__ExternalId__c)
- Text(255), External ID, Unique Case Insensitive
- Note that the External ID field is unique. The ID format is "Mogli Number - Gateway 18char ID". For example, "+12033565270 - a036A0000DtcqQAB".
- This field is used as a key to determine if a record should created or updated (as there can only be one pairing of a Mogli number to gateway).
- Attempting to create a second record with the same ID will result in an error.
- PhoneNumber (Mogli_SMS__Phone_Number__c)
- Text(20), External ID
- This is the Mogli Number for this Latest SMS info record
- Gateway (Mogli_SMS__Gateway__c)
- Lookup (Gateway)
- The Latest SMS Info record holds information about Gateway activities for a certain number.
- Mogli Opt-In (Mogli_SMS__Opt_In__c)
- Checkbox
- TRUE if the PhoneNumber has given consent to be contacted.
- Opt-In Method (Mogli_SMS__Opt_In_Method__c)
- Text (255)
- This text field logs how the Opt-out was done. Within the character limit, you can choose how you want to log the reason/method for opting in.
- Opt-In Date/Time (Mogli_SMS__Opt_In_Date_Time__c)
- Date/Time
- This is the Date and Time when the Last Opt-In occurred.
- Mogli Opt-Out (Mogli_SMS__Opt_Out__c)
- Checkbox
- TRUE if the PhoneNumber has withdrawn / denied consent to be contacted and will block sending from the conversational view and sending from bulk SMS tab via the specified gateway.
- Opt-Out Method (Mogli_SMS__Opt_Out_Method__c)
- Text (255)
- This text field logs how the Opt-out was done. Within the character limit, you can choose how you want to log the reason/method for opting out.
- Opt-Out Date/Time (Mogli_SMS__Opt_Out_Date_Time__c)
- Date/Time
- This is the Date and Time when the Last Opt-Out occurred.
- SMS Number (Name)
- Therefore to properly record Opt-In, the Latest SMS Info record should show:
- Mogli Opt-In = TRUE
- Mogli Opt-Out = FALSE
- Opt-In Method shows helpful text. Example: “Opt-In keyword: START”
- Opt-In Date/Time filled in with the time of the change.
- And to properly record Opt-Out, the Latest SMS Info record should show:
- Mogli Opt-Out = TRUE
- Mogli Opt-In = FALSE
- Opt-Out Method shows helpful text. Example: “Opt-Out keyword: STOP”
- Opt-Out Date/Time filled in with the time of the change.
- If you have migrated to SMS Subscription, and have set Mogli Opt Out field on various objects to False:
- For any automation (workflows, process builder, flow, APEX) you have active that was checking the “Mogli Opt Out” field before creating an outbound SMS record will now need to refer to the Latest SMS Info record to pull the data and determine if a message should be sent or not via the gateway you have specified.
- This will involve getting the Latest SMS Info record using the unique External ID field.
- Your flow should then examine the Mogli Opt-Out field on the Latest SMS Info record, if it is TRUE, then in your automation you should not create that outgoing SMS record.
- For organizations using purpose-specific gateways (dedicating a gateway for marketing messages and another gateway for transaction messages) and using other fields or records to handle consent for messaging then you would need to change the automation to create/update the Latest SMS Inforecord instead. Consider the following examples:
- You have added two check boxes on contact record, one is for “Transactional Messages Opt Out” and the other is “Marketing Messages Opt Out”:
- Trigger flow on field change (either field).
- Get Latest SMS Info record for this number and gateway in question using the External ID format discussed above.
- If it is found, update that record accordingly as shown in the section “Latest SMS Info field” above. (Use a decision step to determine if the number is opting IN or opting OUT.)
- If it is not found, create a new Latest SMS Info record - following the same logic.
- You use a multi-picklist field and there are options for “Transactional Messages Opt Out” and the other is “Marketing Messages Opt Out”:
- Trigger on field change
- Check the BEFORE value IS CONTAIN “Marketing” and the AFTER Value - If IT IS DIFFERENT, THEN it is worth updating or creating the LATEST SMS Info record
- Get Latest SMS Info record for this number and gateway in question using the External ID format discussed above.
- If it is found, update that record accordingly as shown in the section “Latest SMS Info field” above. (Use a decision step to determine if the number is opting IN or opting OUT.)
- If it is not found, create a new Latest SMS Info record - following the same logic.
- You create specific records to represent a contact chose to opt-out of different type of Messages.
- On the creation or update of that consent record…. Find the Mogli Number, find the gateway that relates to the purpose (or legal basis) they are giving consent / withdrawing consent for.
- Get Latest SMS Info record for this number and gateway in question using the External ID format discussed above.
- If it is found, update that record accordingly as shown in the section “Latest SMS Info field” above. (Use a decision step to determine if the number is opting IN or opting OUT.)
- If it is not found, create a new Latest SMS Info record - following the same logic.
- NOTE: The information on your special consent record and Latest SMS record should mirror each other. Consider this scenario: As a person texts STOP via the gateway, Mogli SMS package would automatically update/create the Latest SMS Info record - however your system should also find the corresponding consent record and update it such that both sides of your consent management are in sync. Care should be taken to avoid recursion.update Gateway records to include proper Opt-in and Opt-out keywords
- You have added two check boxes on contact record, one is for “Transactional Messages Opt Out” and the other is “Marketing Messages Opt Out”:
Was this article helpful?