Mogli URL
- 21 Nov 2024
- 4 Minutes to read
- Contributors


- Print
- DarkLight
Mogli URL
- Updated on 21 Nov 2024
- 4 Minutes to read
- Contributors
- Print
- DarkLight
Article summary
Did you find this summary helpful?
Thank you for your feedback
Mogli URL seamlessly integrates with Mogli SMS which enables users to effortlessly create and insert custom short URLs into messages, configure custom domains to ensure brand recognition and SMS carrier compatibility, and provide engagement analytics which includes personalized click tracking.
Installation
Mogli URL requires version 5.103.4 (Blanca Peak) or later and is only compatible with Salesforce Lightning. This feature is not available in Salesforce Classic.
Configuration
Step 1: Enable the Mogli API

In Salesforce, navigate to the Mogli SMS Application Settings, and find the Mogli API tab.
Click Request API Key.
Note: If you are configuring Mogli SMS in a Sandbox, you will need to input your Production Org ID.
Once an API key is obtained, it may take a minute before it is activated. Click the Check Status button to confirm that your Mogli API key has been activated.
Click the Authorize button to use OAuth to authenticate the Mogli Technologies connected app.
Step 2: Configure a Custom Domain
A custom domain can be a domain that you have purchased specifically for Mogli URL, or it can be a subdomain of a domain you already own. You will need access to your domain via your domain provider, such as Go Daddy to create CNAME records.
External documentation to create CNAME records:
AWS | Go Daddy | Squarespace | Azure | Google Domains | Bluehost | Dreamhost | HostGator | Hover | Dynadot | IONOS

In Salesforce, navigate to the Mogli SMS Application Settings and find the Mogli URL tab.
Click Configure New Domain.
Enter your domain name and click Create Domain.
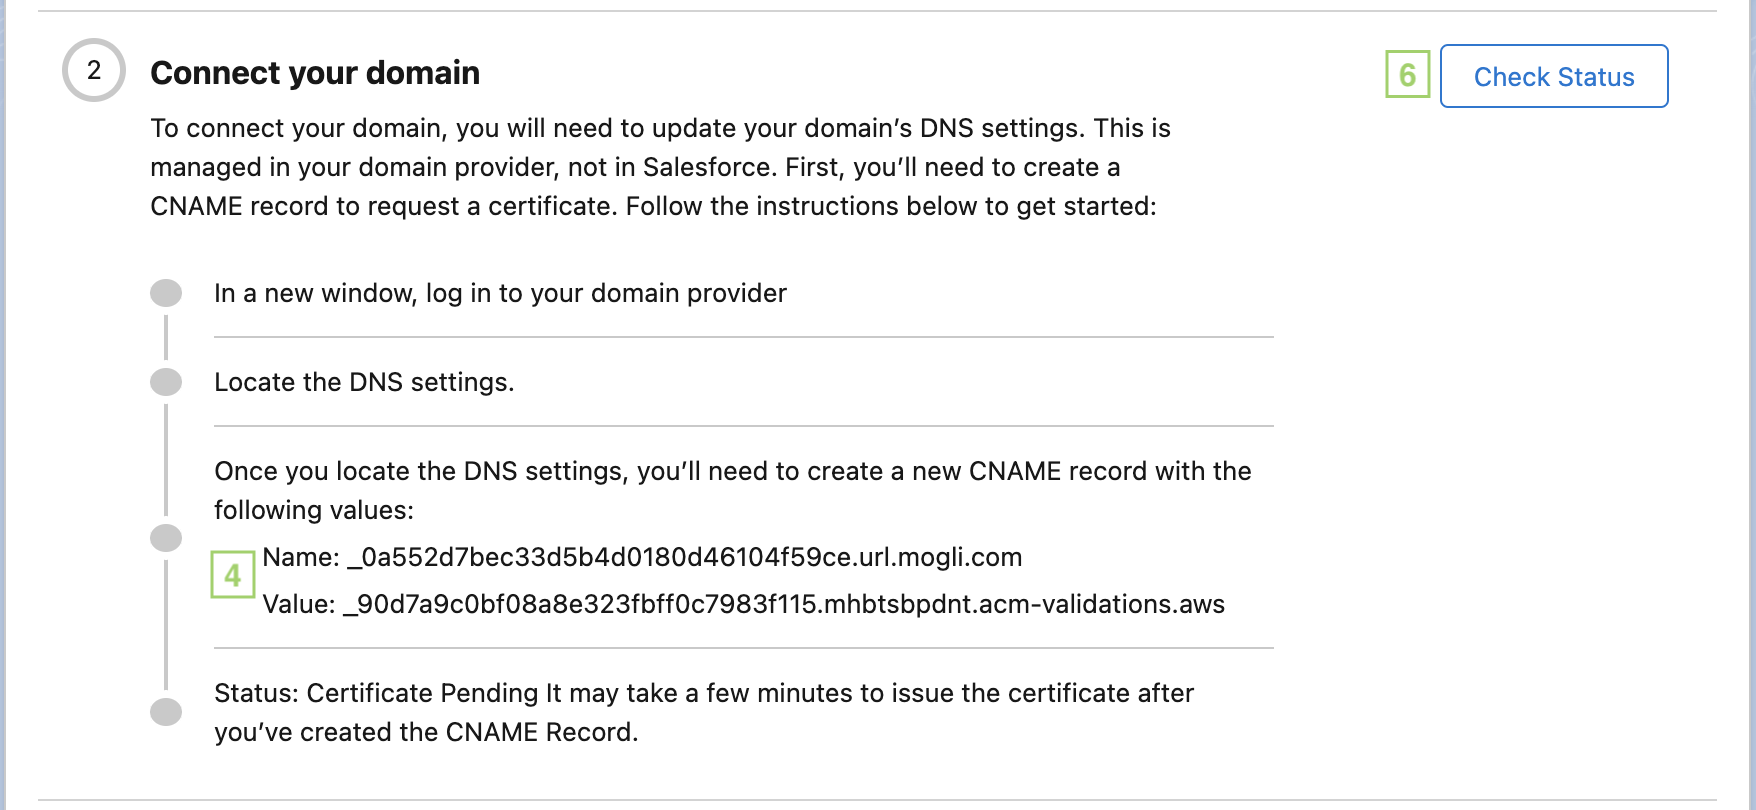
Note the Name and Value provided in the Connect your domain section of the setup assistant. You will use these to create a CNAME record in your domain provider.
In a new tab, login to your domain provider and create a CNAME record using the Name and Value in the provided in the domain setup assistant.
Wait a few minutes, and click Check Status to see if your certificate has been issued.
If after 5 minutes, you are unable to proceed, delete the CNAME and try again
.png "image(3).png")
Once your certificate has been issued, you will be able to proceed to the Register domain section.
Note the Name and Value provided in the Register domain section of the setup assistant. You will use these to create an A Record in your domain provider.
In your domain provider, create an A Record using the Name and Value in the provided in the Register domain section.
Wait a few minutes, and click Check Status to see if your domain has been registered.
If after 5 minutes, you are unable to proceed, delete the A Record and try again.
Once your domain has been registered, it will be displayed in the Mogli URLs list view with an Active Status.

.png "image(3).png")

Using Mogli URL
Creating a new Mogli URL
To create a new Mogli URL, click the URL button in the Conversation View. If you do not see a URL button, reach out to help@mogli.com.

Destination - The long URL that you are shortening
Title - The title of the URL used only for internal organization and reporting.
Domain - The custom domain that the URL will use.
Custom back-half - You can define a custom back half for the URL, or you can leave it blank and a 6-character slug will be automatically inserted.
Personalized engagement tracking - When a URL has personalized engagement tracking enabled and is sent over Mogli SMS, an additional 6-character slug to the end of the URL and when the recipient clicks on the URL, the Mogli URL Engagement record is related to the SMS. This allows you to track who has engaged with your URL.
Note: Personalized engagement tracking is a paid feature. If this toggle is disabled, reach out to help@mogli.com for more information.
Save & Insert - Save your URL and immediately insert it into the message text.
Save - Save your URL and return to the URL list.
Mogli URL list

Click < Back or the Mogli URL button to return to the Conversation View
You can filter the URL list by Active or Inactive URLs.
Note: Inactive URLs cannot be sent over SMS, but the URL itself can still be visited.
If you have a long list of URLs, you can search here.
Note: Search is currently limited to the title of the URL.
Click to create a new URL.
Click to copy the URL. This can be pasted anywhere (email, print marketing, etc.).
Click to deactivate the URL.
Shows the number of engagements on the URL. This includes both personalized and non personalized engagements.
Shows that personalized engagement tracking is enabled on the URL.
A URL with a custom back-half.
A URL without a custom back-half where a random 6-character slug is used.
Inserting a URL
![]()
To insert an existing URL, click on the Mogli URL button on the Conversation View.
Click anywhere in the highlighted box to insert the URL and close the URL list.
If personalized engagement tracking is enabled, the 6-character personalized slug will be inserted after the message is sent.
Engagement reporting

The Mogli URLs with Engagement Info report is included, and will show all URLs with engagements, and personalized tracking information if available.
This report can be cloned and modified to suite your business needs.
Note: To create a new report, use the custom report type: Mogli URLs with Engagement Info.
Was this article helpful?