Merge Fields
- 04 Feb 2025
- 4 Minutes to read
- Contributors


- Print
- DarkLight
Merge Fields
- Updated on 04 Feb 2025
- 4 Minutes to read
- Contributors
- Print
- DarkLight
Article summary
Did you find this summary helpful?
Thank you for your feedback
Merge Fields
Watch this 60-second Mogli Minute on Merge Fields
Contact & Lead Merge Fields
Contact and Lead merge fields may be utilized in 1:1 conversations, SMS Templates, and bulk sends.
- Go to the Application Settings tab and select Default
- Populate your chosen standard or custom Contact and Lead merge fields in the fields labeled Contact Merge Fields and Lead Merge Fields. Use the API format. Custom fields must include __c at the end. Separate each merge field with a comma and space
- Save. Your merge fields are now ready for use.

Using Merge Fields in SMS Templates and 1:1 Conversations
Enter merge fields in double curly brackets like this: {{Favorite_Color__c}} or {{FirstName}}.
Example: Hi, {{FirstName}}. Don’t forget about your appointment tomorrow at 1:00PM!
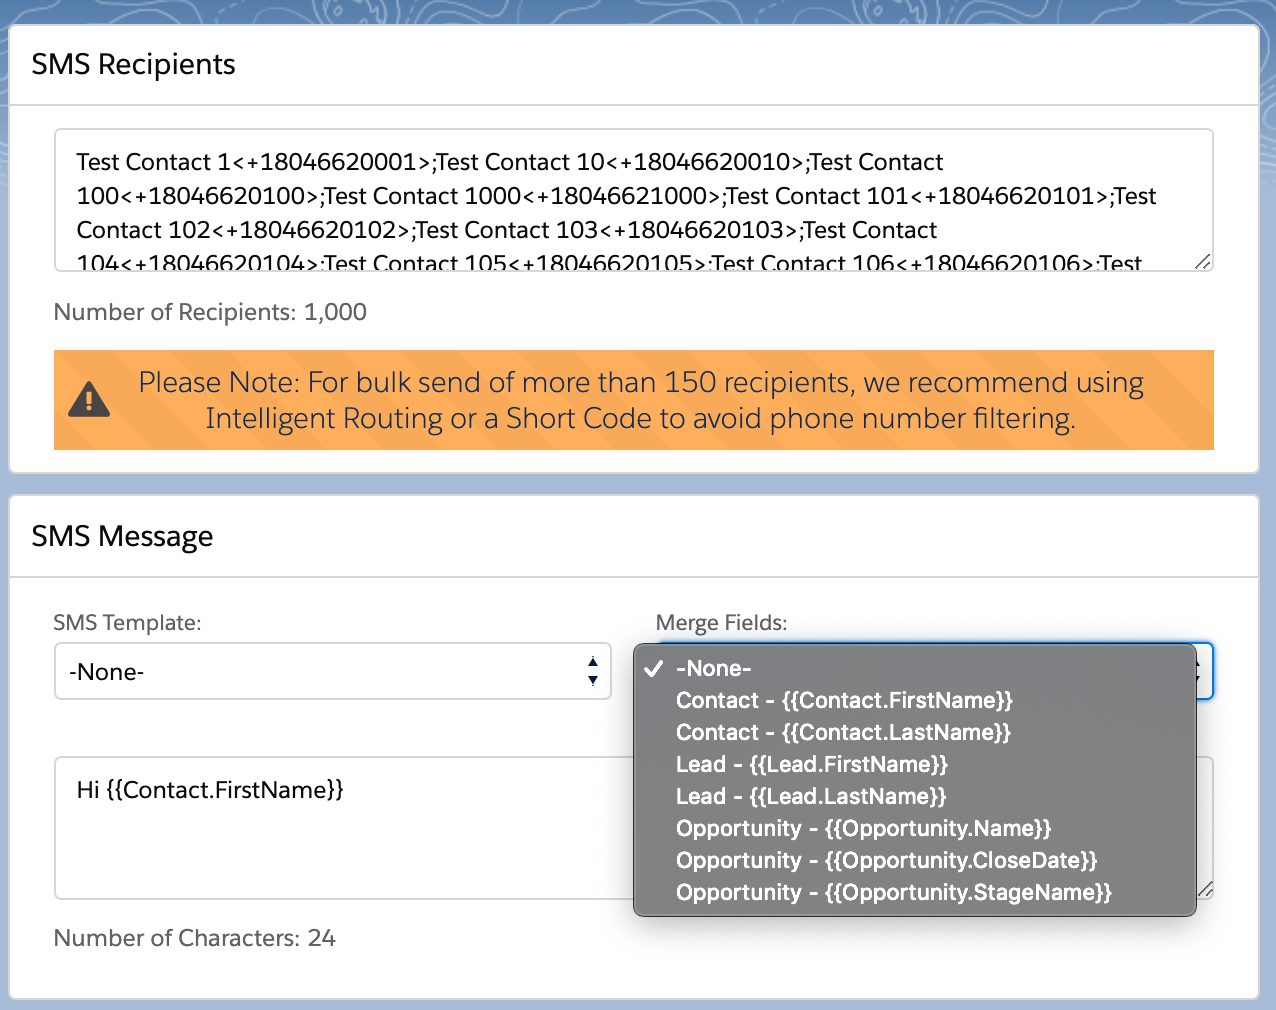
Using Merge Fields in Bulk Messages
From the Bulk SMS or Bulk SMS Lightning tab, locate the Merge Fields dropdown menu:
Note: Merge Fields configured on objects besides Contact and Lead will also appear in the dropdown menu in Bulk SMS and Bulk SMS Lightning.
Merge Field FAQs
How do I populate the Contact Owner merge field in a text message?
Add the API name of Owner.Name to Contact Merge Fields and/or Lead Merge fields in Application Settings, then test.
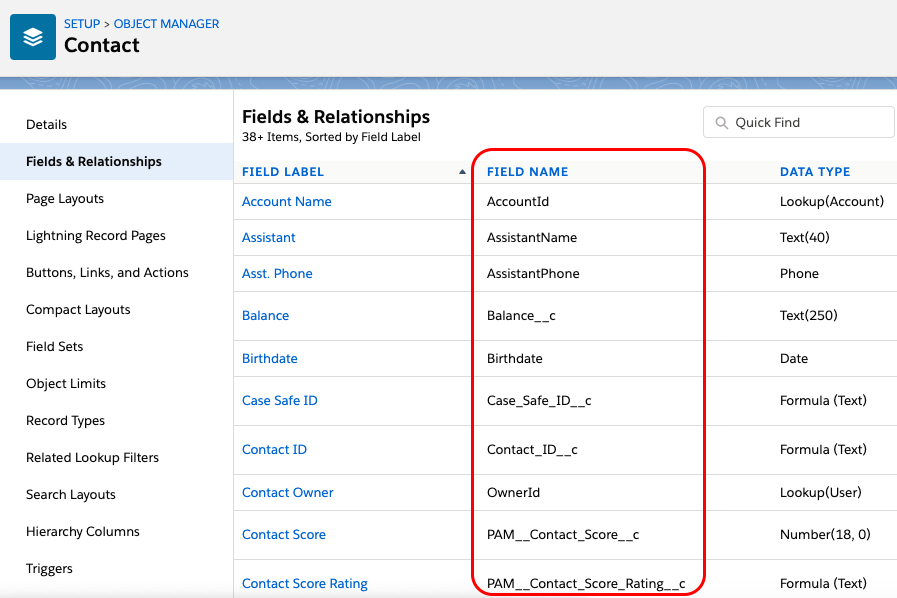
Where do I find the API-formatted names of the Contact and Lead fields?
- In Lightning, from Setup, click Object Manager.
- Find the Contact or Lead object and select Fields and Relationships.
- In the Field Name column, you’ll find the API names.
Can I use the field {{Id}} as a merge field?
At this time, you cannot use the {{Id}} field as a merge field, at least not directly. A workaround for this current limitation is to create a formula field that pulls in the Id, then use your new formula field as a merge field instead. Please reach out to help@mogli.com if you need any assistance with this.
What about merge fields on Person Accounts?
Person Account Merge fields must all live on the Contact object. Populate the merge fields you want to use for Person Accounts in Application Settings under Contact Merge Fields (separate with comma + space).
Merge fields from Account side can be added to the contact object via formula, using the Account lookup on the contact record (the account lookup is created when person accounts are enabled and may not be visible under 'Fields & Relationships').
What happens if I enter a merge field incorrectly?
Merge fields entered incorrectly in the Application Settings/Mogli Settings or Custom metadata can lead to a degradation in Mogli functionality! To avoid this, please ensure that your merge field API names are correct and each field is entered according to the instructions provided within this guide.
Merge Fields for Additional Objects
For objects besides Contact or Lead, configure merge fields by following these steps:
- From Setup, click Object Manager
- Select the object on which Mogli is configured
- Select Fields & Relationships
- Make note of the API names of the fields you wish to reference as merge fields.
- Within Setup, enter Custom Metadata into the Quickfind bar and select Custom Metadata Types.
- Next to Mogli Integrated Object, click Manage Records
- Click Edit next to the Mogli-configured object of your choice
- Locate the Merge Fields section, and enter the API names of your fields in this format (separated by comma but with NO RETURNS OR SPACES): FirstName,LastName,Email,Favorite_Color__c,Favorite_Food__c
- Merge fields will now be accessible in the Bulk SMS Lightning dropdown menu.
Alternatively, place your field name within double curly brackets in conversation view, such as {{Favorite_Color__c}}

ADMIN TIP:
Merge fields can be used from more than one object related to the SMS record ONLY when created from an automation (such as a Flow) and so long as the lookup field for the object is populated (on the SMS record) AND the merge field includes an object prefix.
While a message sent from a Contact record might look like this:
“Hi {{firstname}}, We have received your case, and will reach out shortly for more information.”
A message sent via automation and related to both a Contact record AND a Case record and with BOTH object lookups populated could look like this: “Hi {{Contact.FirstName}}! We have received your Case: {{Case.CaseNumber}}. We will review your request and reach out shortly for more information!
Messages sent from the conversation view or bulk screen, not from an automation must use formula fields located on the sending object to include data from other objects.
Helpful Merge Field Formulas
DATE/TIME to TEXT(DATE) Reformat
TEXT(MONTH(DATEVALUE(DateTime__c)))
& "/" &
TEXT(DAY(DATEVALUE(DateTime__c)))
& "/" &
TEXT(YEAR(DATEVALUE(DateTime__c)))
DATE to TEXT(DATE) Reformat
TEXT(MONTH(DateTime__c))
& "/" &
TEXT(DAY(DateTime__c))
& "/" &
TEXT(YEAR(DateTime__c))
DATE/TIME to TEXT(TIME) Reformat (without daylight savings adjustment)
IF(
OR(VALUE( MID( TEXT( DateTime__c - (#/24) ), 12, 2 ) ) = 0, VALUE( MID( TEXT( DateTime__c - (#/24) ), 12, 2 ) ) = 12),
"12",
TEXT( VALUE( MID( TEXT( DateTime__c - (#/24) ), 12, 2 ) ) - IF( VALUE( MID( TEXT( DateTime__c - (#/24) ), 12, 2 ) ) < 12, 0, 12))
)
& ":" &
MID( TEXT( DateTime__c - (#/24) ), 15, 2 )
& " " &
IF(
VALUE( MID( TEXT( DateTime__c - (#/24) ), 12, 2 ) ) < 12, "AM", "PM"
)
# represents the number of hours between your time zone and GMT.
For example, mountain time’s value would be 7/24. This may change by 1 hour during daylight savings.
See the following charts for the standard time zone UTC offset:
| STANDARD TIME | ||
|---|---|---|
| Atlantic Standard Time | AST | GMT -4 |
| Eastern Standard Time | EST | GMT -5 |
| Central Standard Time | CST | GMT -6 |
| Mountain Standard Time | MST | GMT -7 |
| Pacific Standard Time | PST | GMT -8 |
| Alaskan Standard Time | AKST | GMT -9 |
| Hawaiian Standard Time | HST | GMT -10 |
| DAYLIGHT SAVINGS TIME | ||
|---|---|---|
| Atlantic Daylight Time | ADT | GMT -3 |
| Eastern Daylight Time | EDT | GMT -4 |
| Central Daylight Time | CDT | GMT -5 |
| Mountain Daylight Time | MDT | GMT -6 |
| Pacific Daylight Time | PDT | GMT -7 |
| Alaskan Daylight Time | AKDT | GMT -8 |
| Hawaiian Standard Time | HST | GMT -10 |
TIME to TEXT(TIME) Reformat
Use this formula to convert a time field in HH:MM:SS.MSZ format (and other variations) to text:
IF(
HOUR(Time__c) < 12,
TEXT(HOUR(Time__c)) & ":" & TEXT(MINUTE(Time__c)) & " AM",
IF(
HOUR(Time__c) = 12,
TEXT(HOUR(Time__c)) & ":" & TEXT(MINUTE(Time__c)) & " PM",
TEXT(HOUR(Time__c) - 12)) & ":" & TEXT(MINUTE(Time__c)) & " PM"
))
Was this article helpful?