Branching Form Templates
- 27 Feb 2023
- 5 Minutes to read
- Contributors


- Print
- DarkLight
Branching Form Templates
- Updated on 27 Feb 2023
- 5 Minutes to read
- Contributors
- Print
- DarkLight
Article summary
Did you find this summary helpful?
Thank you for your feedback
Mogli chooses the best response to send to the recipient based on how they interact.
Branching Form Templates deliver a professional, customized interaction for your recipients.
WATCH THIS 60-SECOND MOGLI MINUTE ON BRANCHING FORM TEMPLATES
Blueprint Your Script
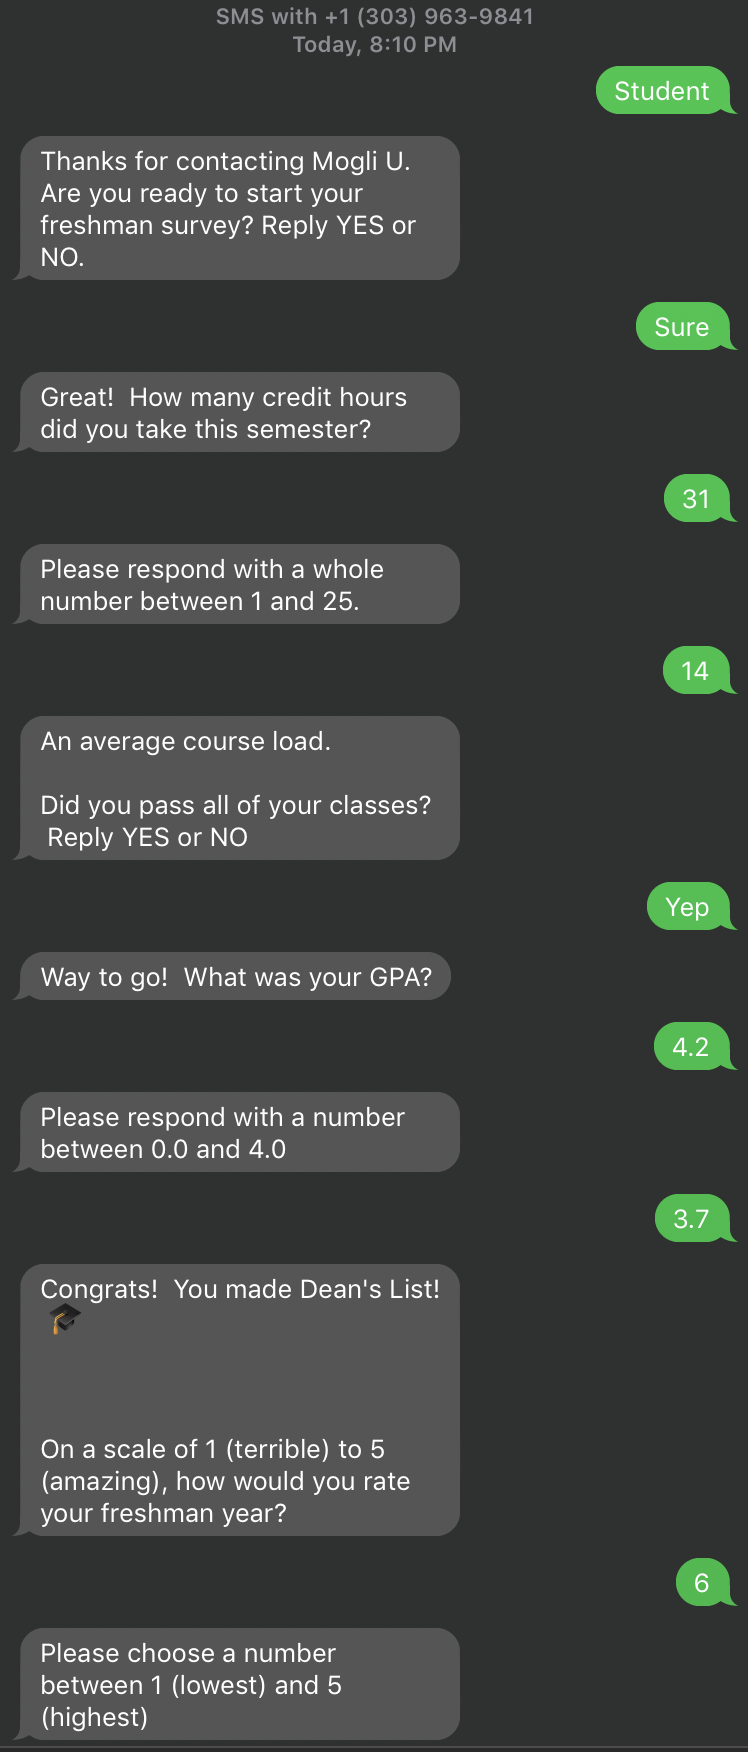
We’re going to create a survey that Mogli University Freshmen can complete at year-end.

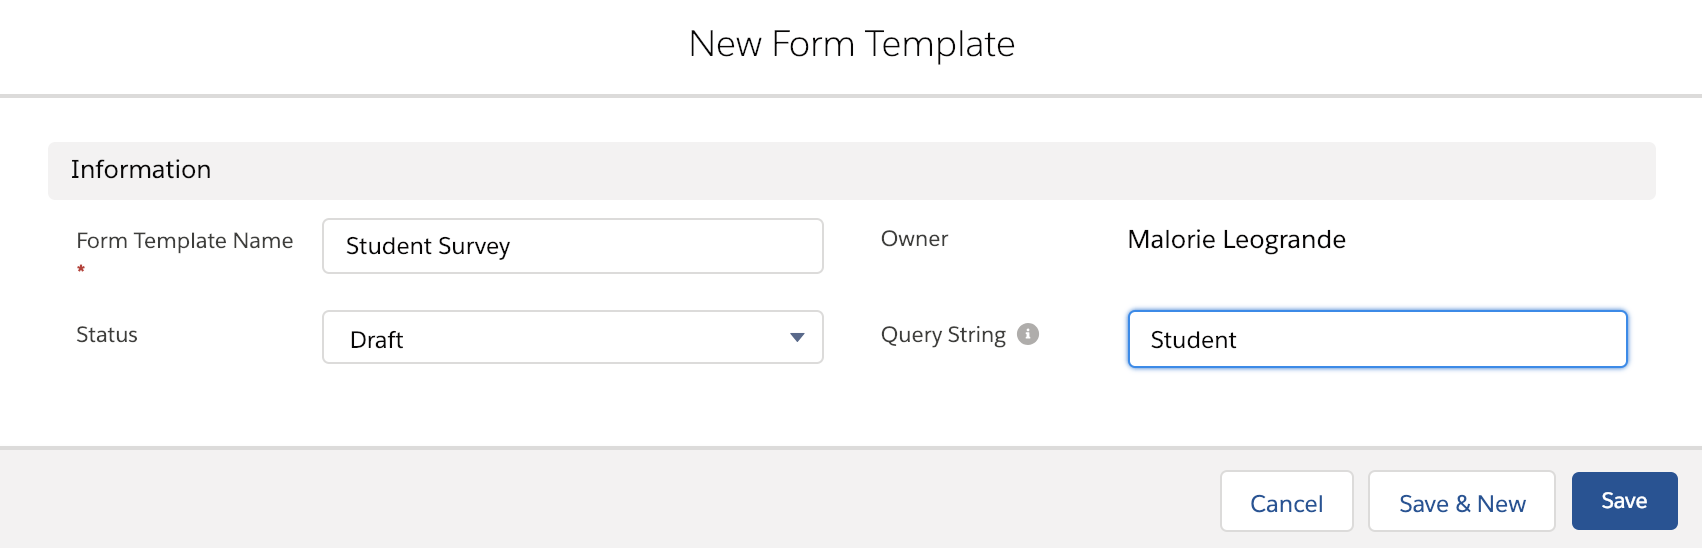
Create the Form Template
- Go to the Form Templates tab and select New
- Name your Form Template and select Draft for the Status
- Create an inbound keyword and put that in the Query String field. (This will be the word someone will text in to initiate the survey.)
 Creating a New Form Template

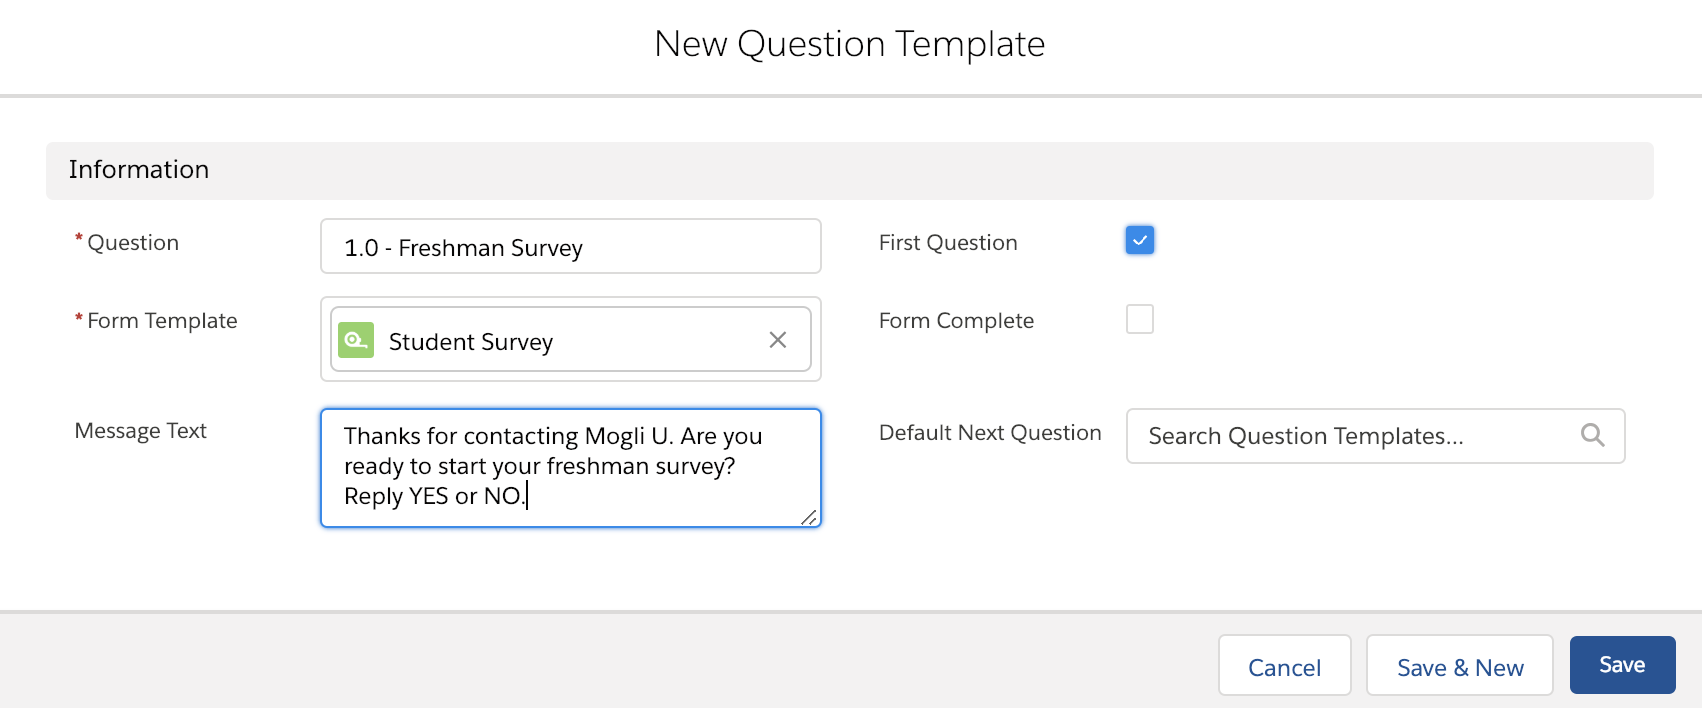
Create and Number Your Questions
- Click the caret by Question Templates and click New

- Name the question, select the associated Form Template, and enter your Message Text. Since this is the first question that will be sent when someone texts in the word STUDENT, check the First Question checkbox. Click Save & New
- USER TIP: Number your Question Template Names (1.0, 1.1, 2.0, etc) to easily organize the order.
Populating fields for the first Question in a Form Template
- USER TIP: Number your Question Template Names (1.0, 1.1, 2.0, etc) to easily organize the order.
- Repeat the step above for your second question, naming it appropriately, and inputting your Message Text. Since this question is neither the first or last, do not check either of the First Question or Form Complete checkboxes. Click Save & New.
- Continue naming and numbering all questions so that your Form Template includes the following:
- Ensure that your first question has the ‘First Question’ checkbox checked.
- Ensure that all last questions have the Form Complete checkbox checked.
- Ensure that every Question Template is unique.
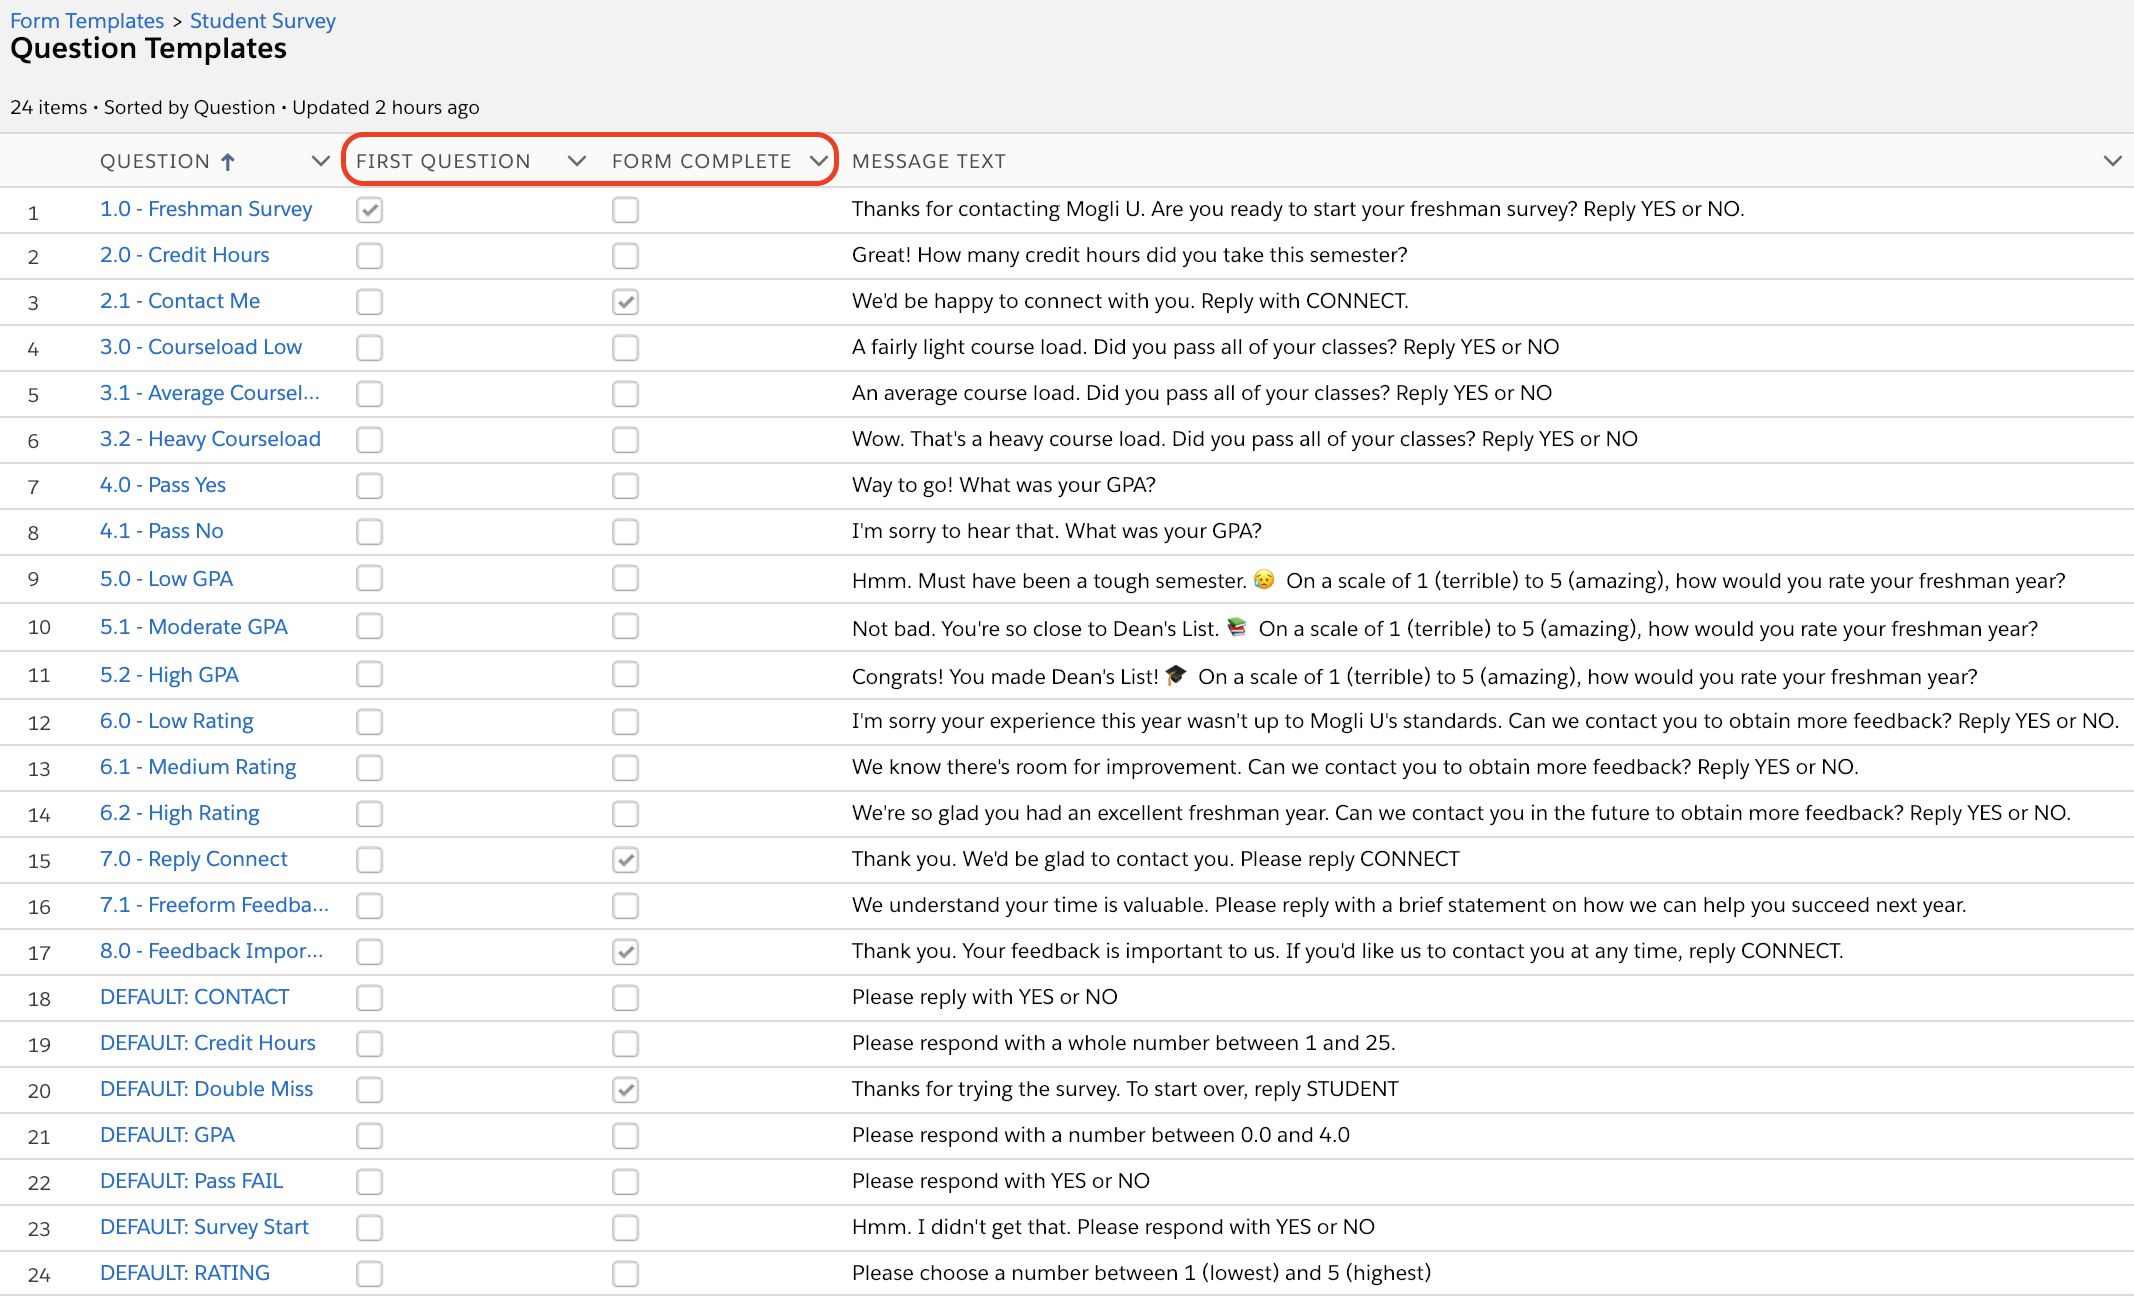 Question Template for a branching Form Template (prior to ordering questions)


Program Your Possible Answers
For branching surveys, there’s an extra step of designing how the survey will fork, dependent upon incoming responses. This is where Possible Answers come into play.
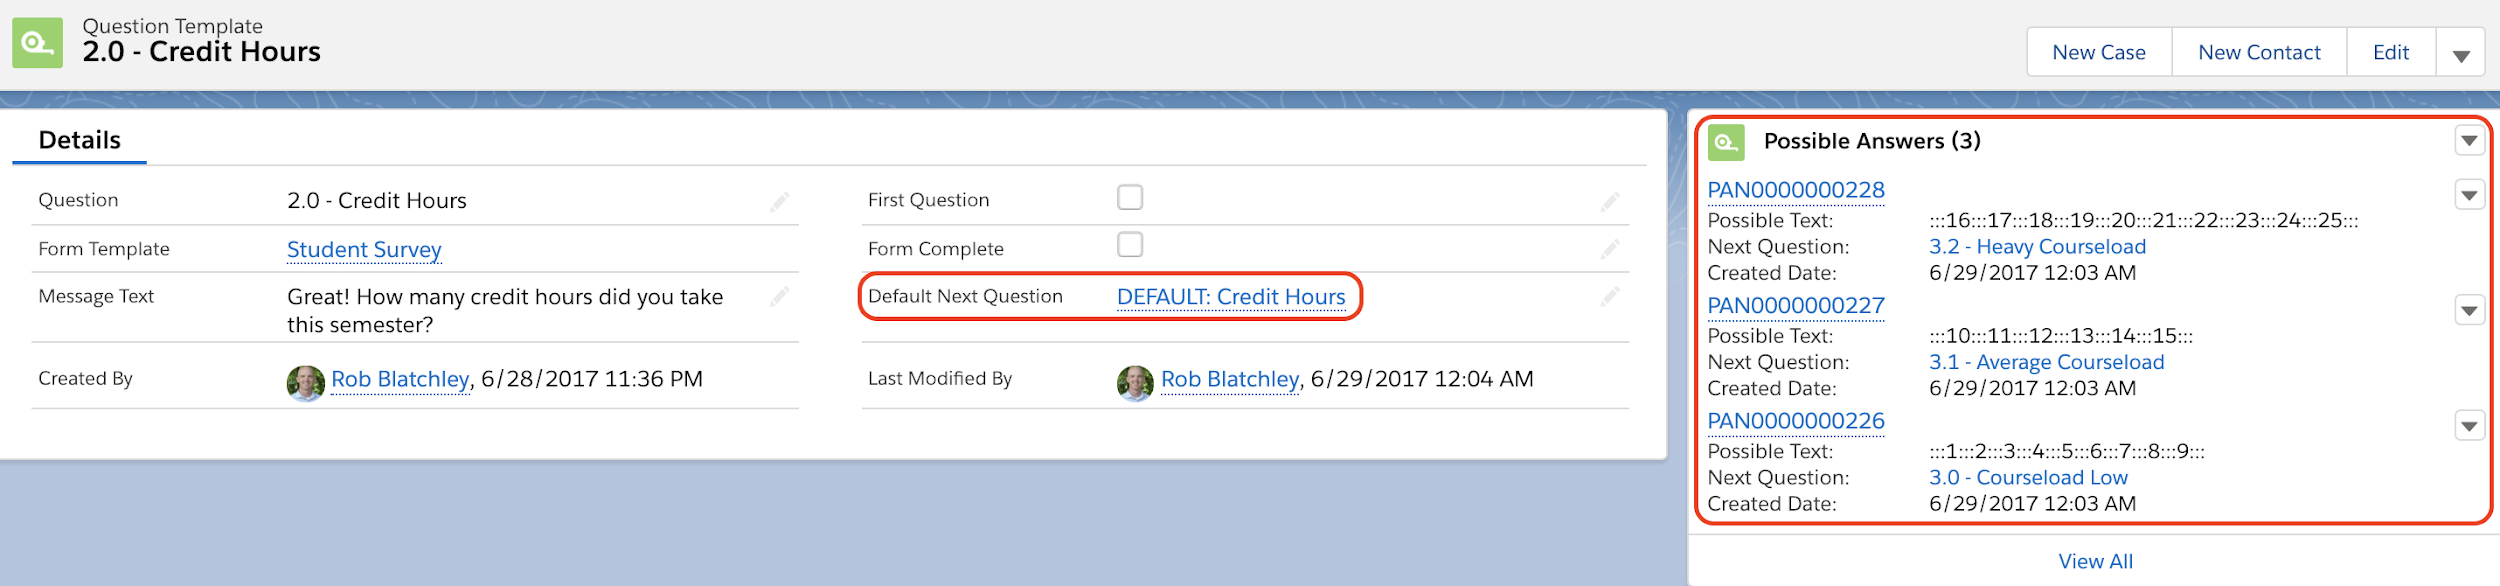
- Click on your first question

- In this example, we’re asking for a YES or NO response, but we know that people don’t always follow directions. So, we’ve got to program in some possible YES and NO responses which will keep constituents on the survey path. Click the Carrot next to Possible Answers, and click New:

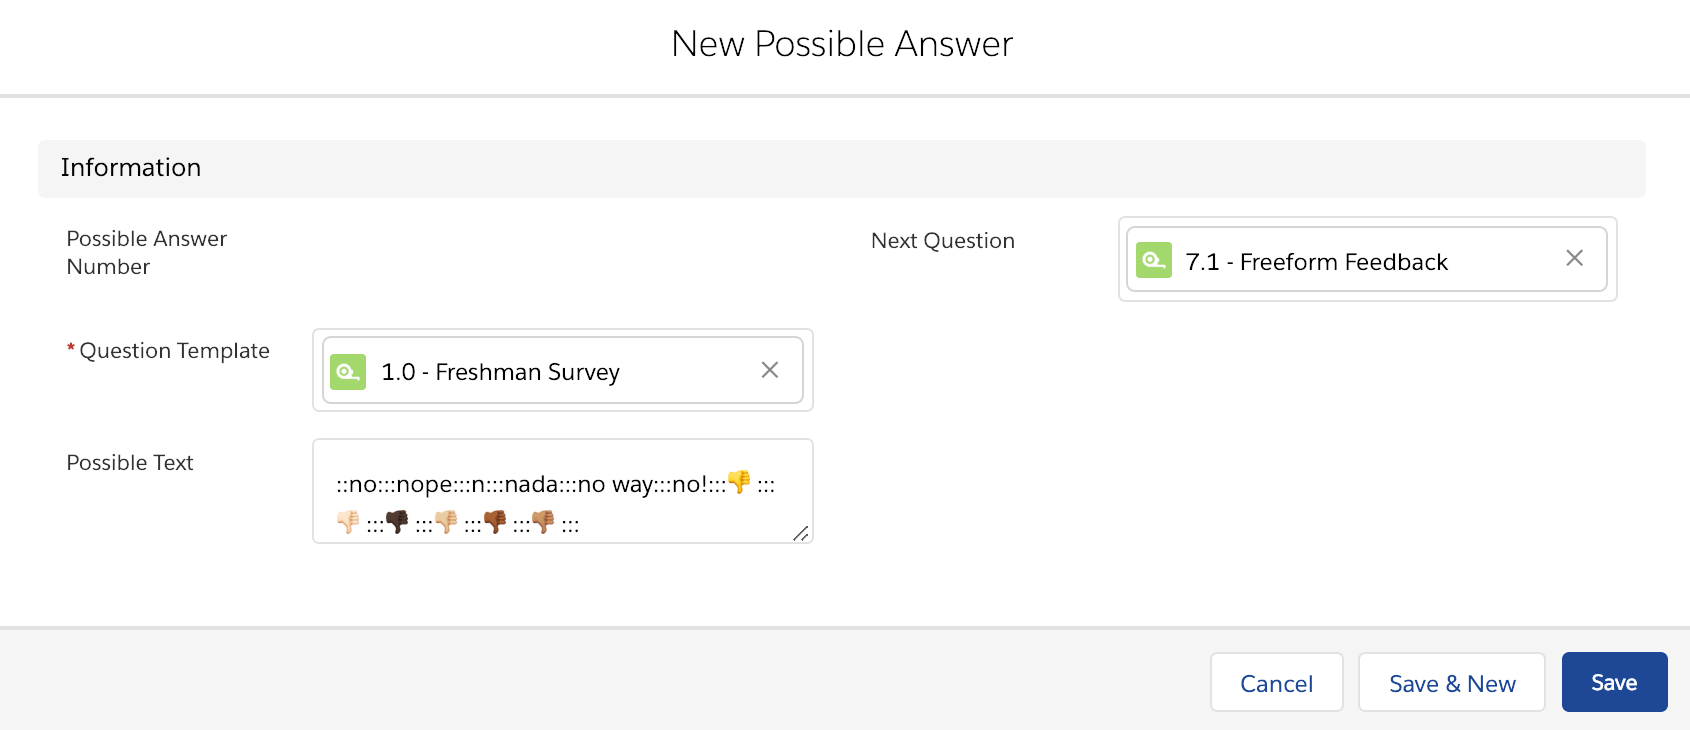
- Program in a set of Possible Text for your question. If it’s a YES or NO question, there are many variations of those. Start with the YES answers. Separate possible responses using :::as a delimiter. Populate the Next Question field with the question someone will receive if they respond with one of your YES Possible Answers. Click Save & New.
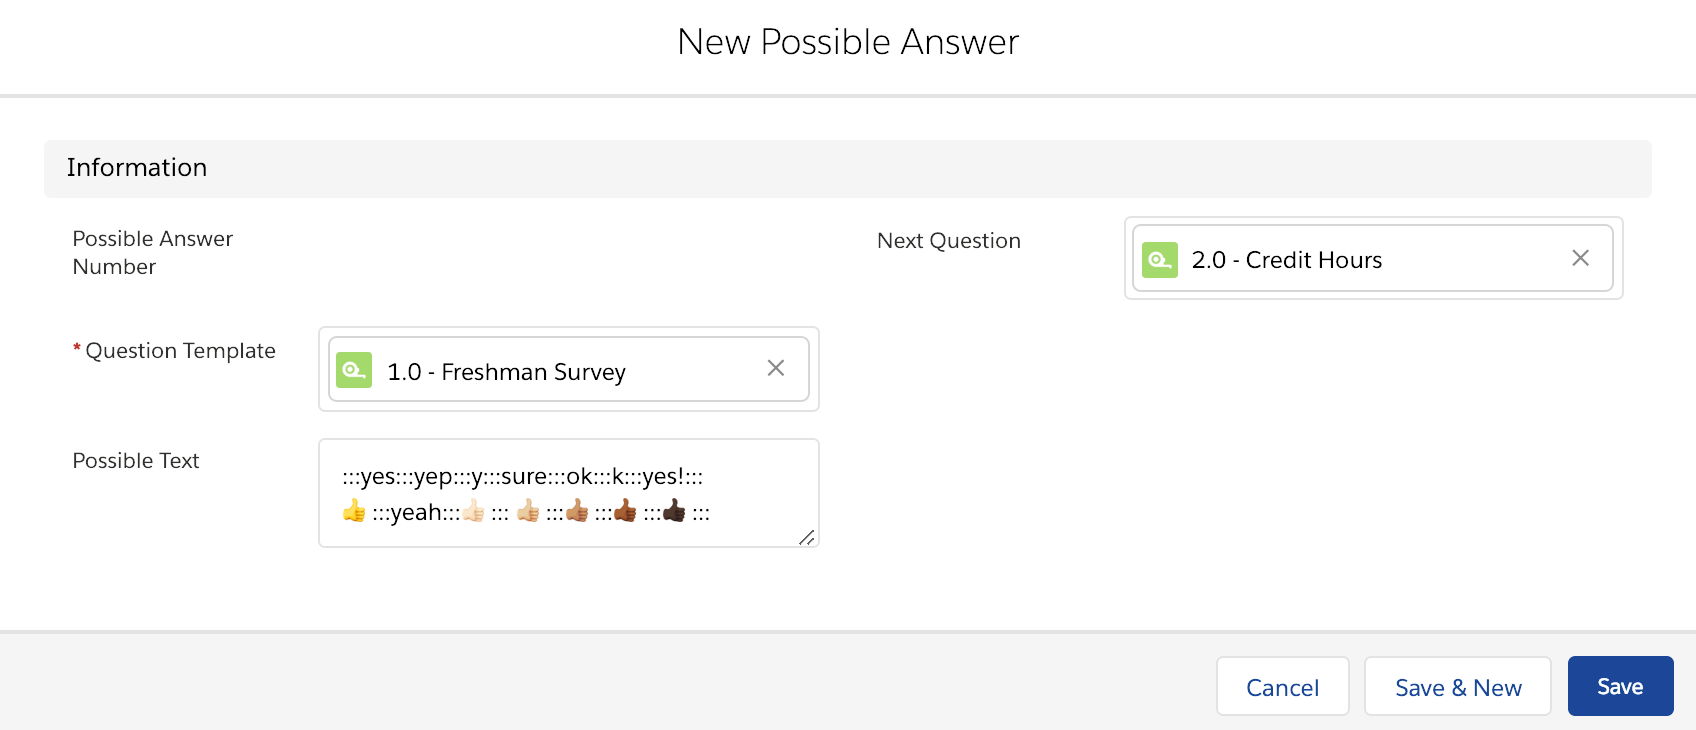
Programming Possible Answers for YES responses, and the Next Question for those responses
- Program in a set of Possible Answers for NO responses. Click Save.
- You’ve just programmed Possible Answers for your first question, along with the question that follows according to those Possible Answers.
- What if someone doesn’t respond with one of your Possible Answers?
- Cue the Default Next Question, which is the question someone receives to get them back on the survey track. In this case, our Default Next Question will be ‘DEFAULT - Survey Start,’ which states: Hmm. I didn’t get that. Please respond YES or NO

The Default Next Question and Possible Answers for the first question
- Cue the Default Next Question, which is the question someone receives to get them back on the survey track. In this case, our Default Next Question will be ‘DEFAULT - Survey Start,’ which states: Hmm. I didn’t get that. Please respond YES or NO
- Click on the Default Next Question (DEFAULT: Survey Start, in this example). If applicable, program your Possible Answers and Next Question.
- If you so choose, in the Default Next Question field, you can populate what we call a Default Double Miss - which is our plan of action when someone doesn’t follow directions repeatedly.
- In this case, our Default Next Question will be ‘DEFAULT - Double Miss,’ which states: Thanks for trying the survey. To start over, reply STUDENT

Possible Answers for the Default Question and populating the Default Double Miss
- Click on DEFAULT: Double Miss.
- We think of the Default Double Miss as the last straw, so we make it a possible end to a survey, and ensure that the Form Complete checkbox is checked.
- There will be no Possible Answers for the Default Double Miss
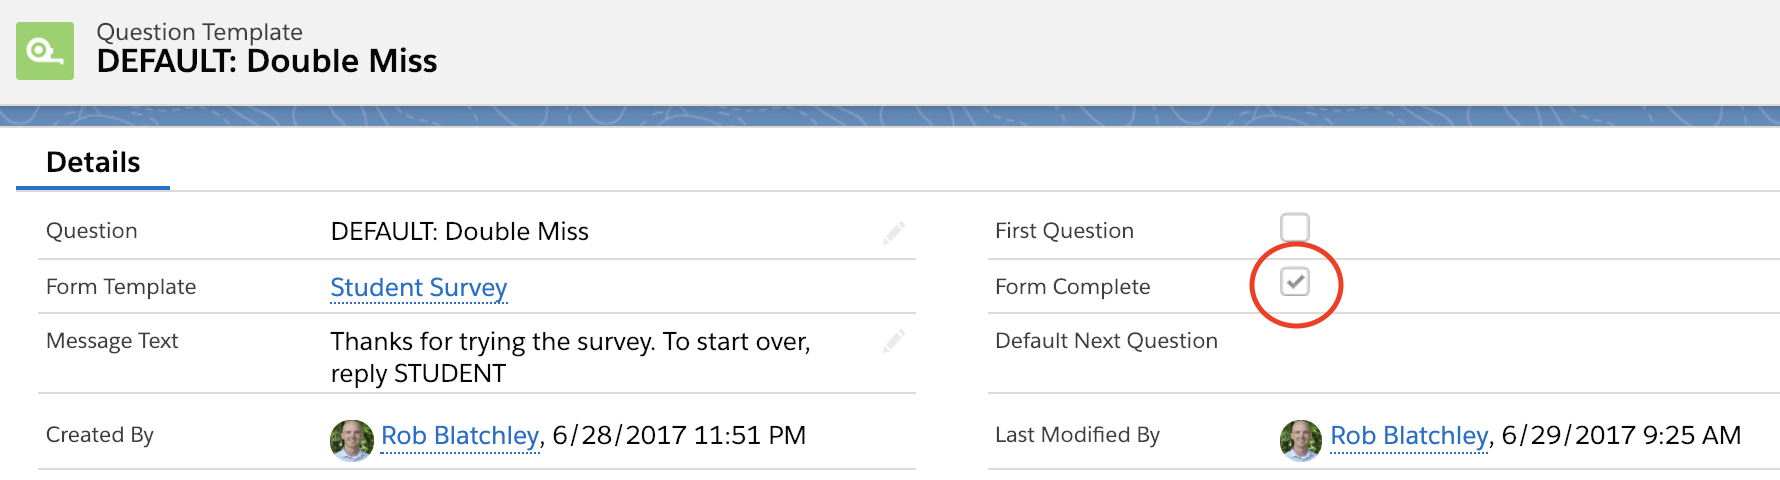
The Default Double Miss is a potential end to your survey
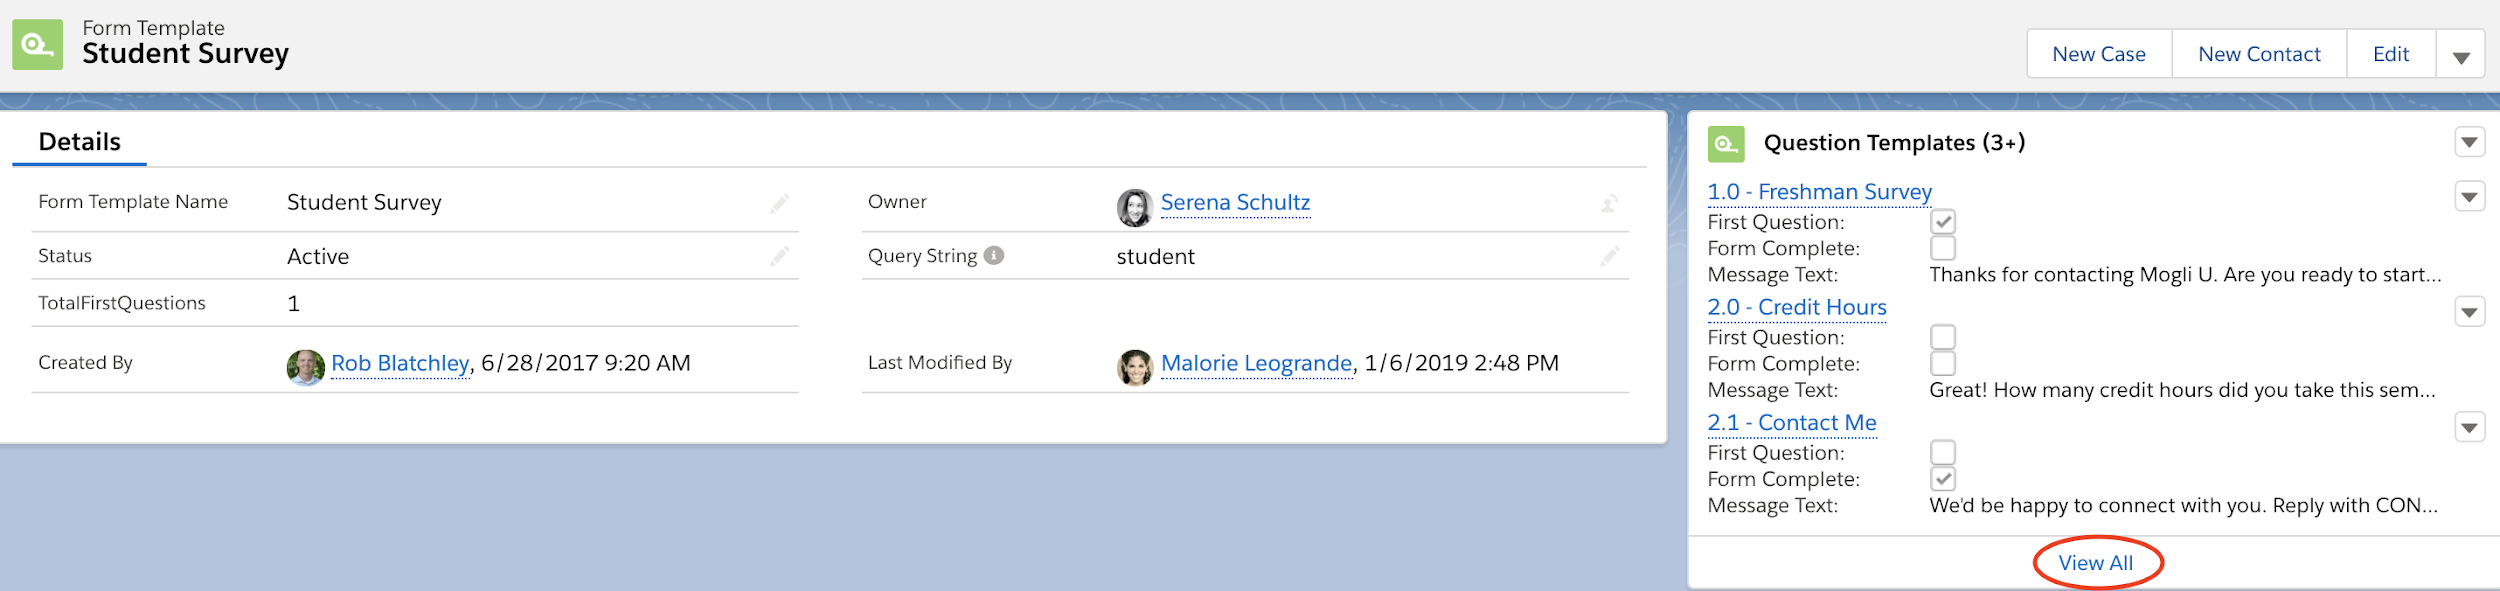
- Click on the Form Template name (Student Survey) to be taken back to the Form Template record, and select View All in the Question Template related list:
- Select your next question.
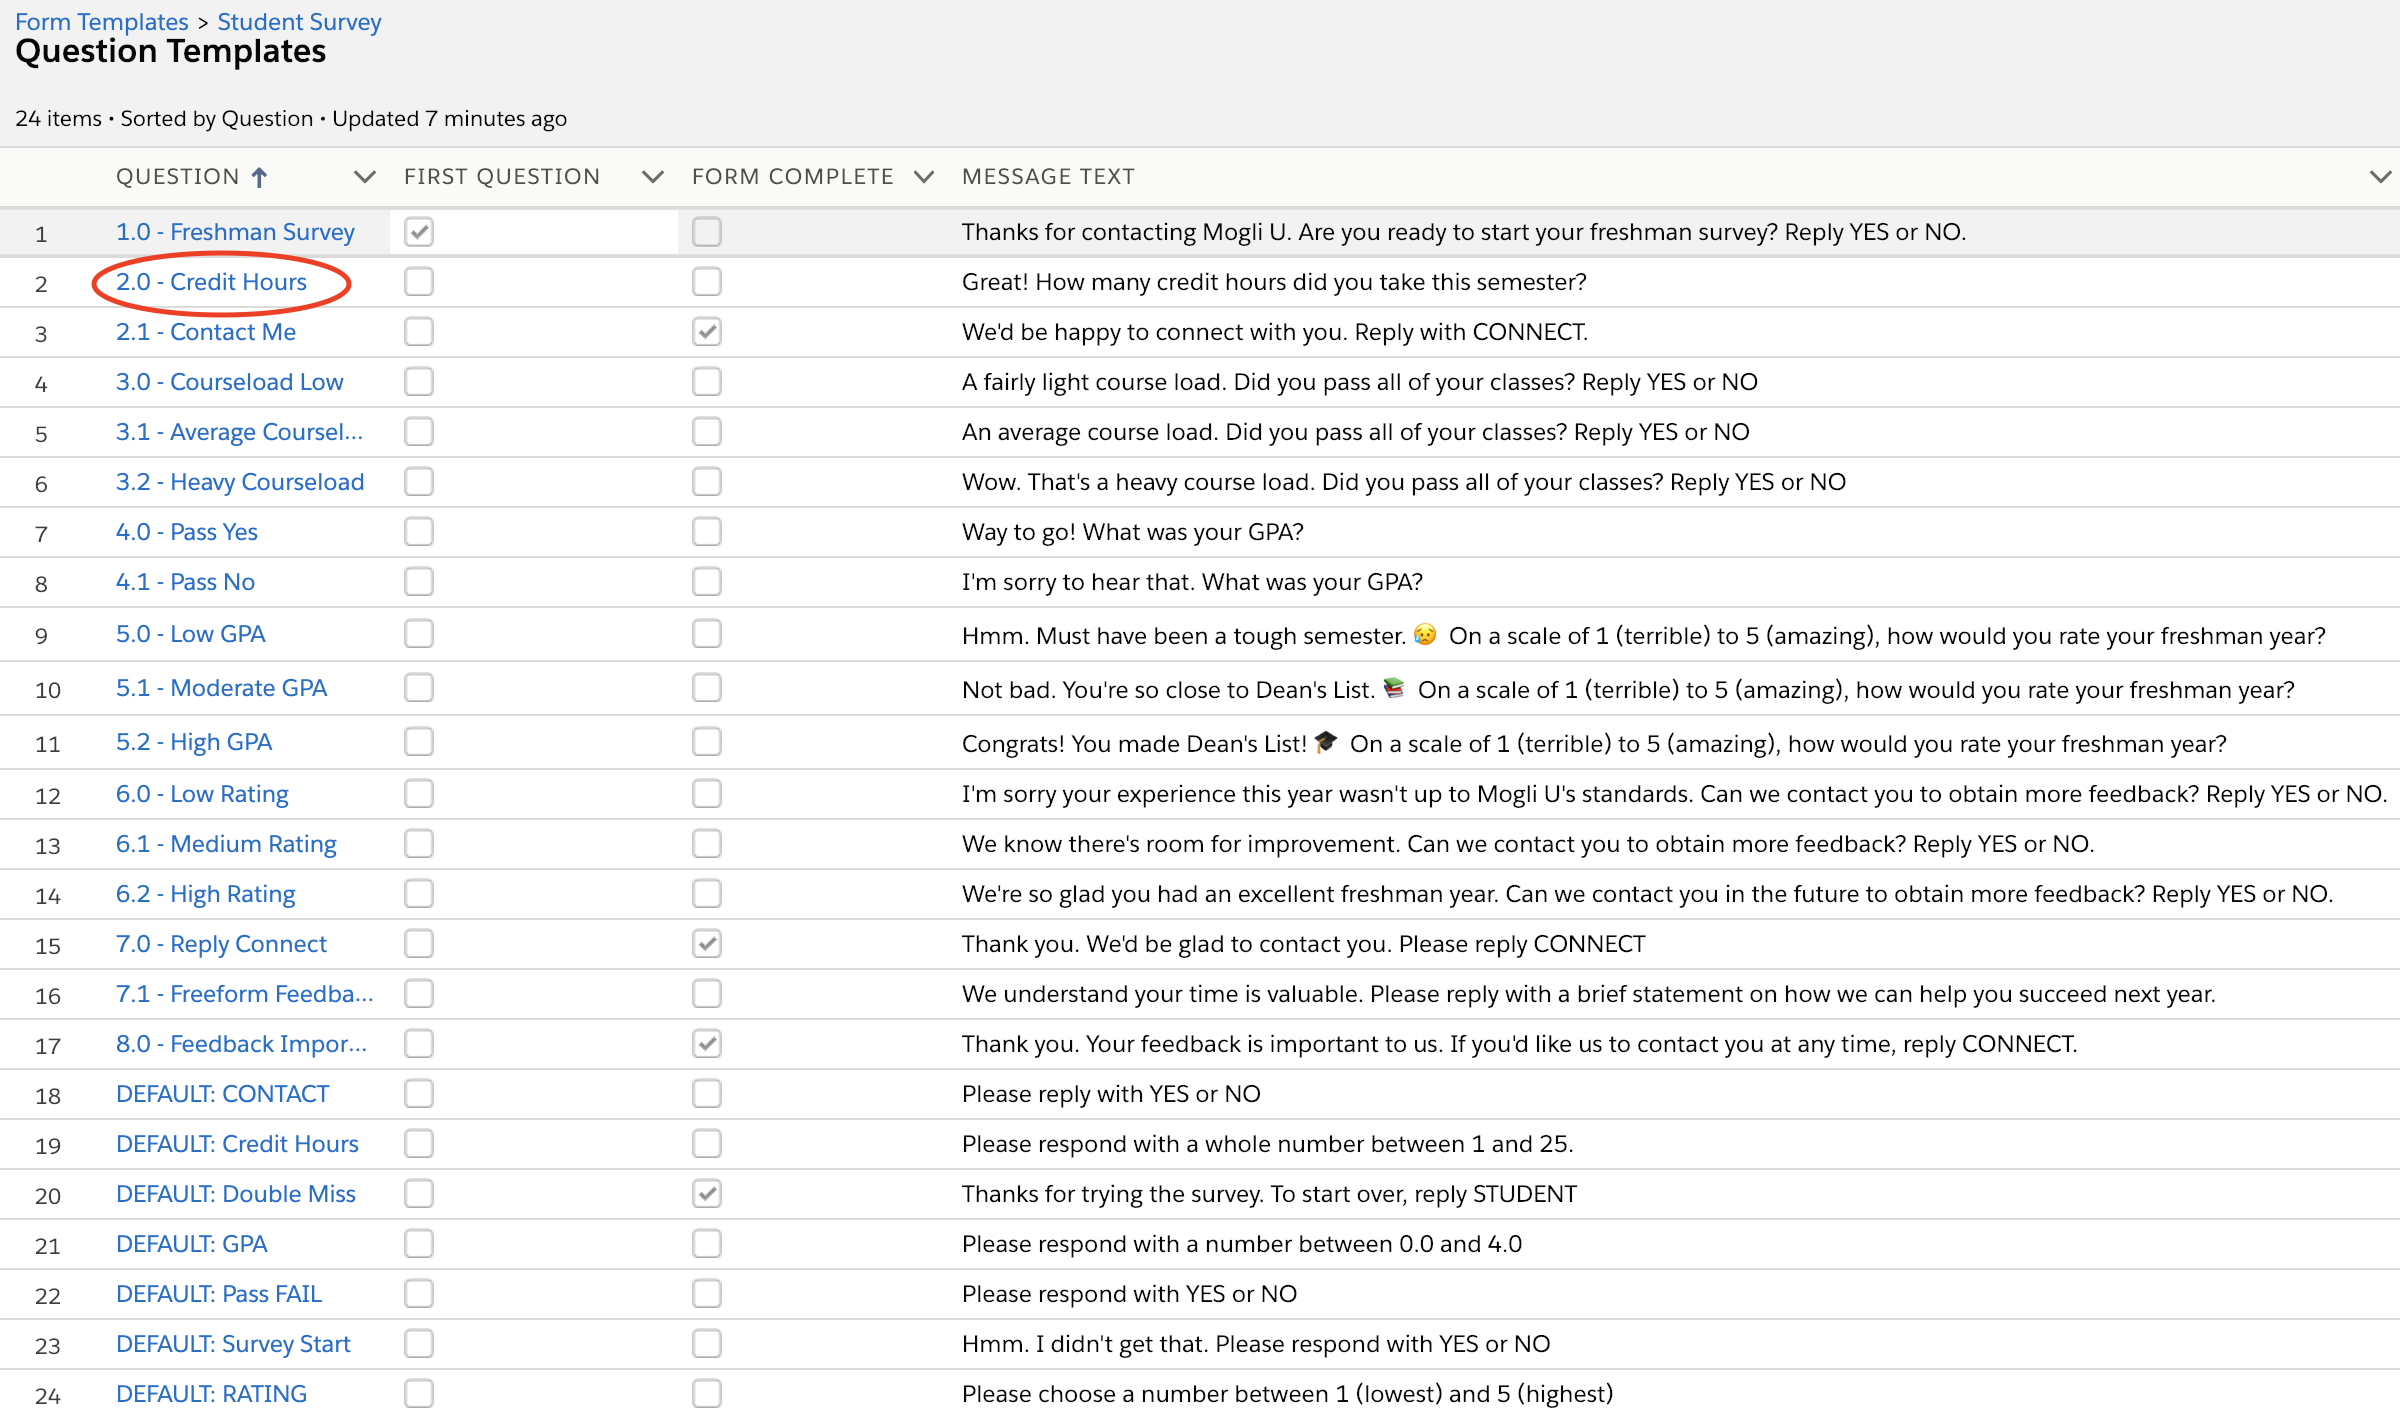
The list of Question Templates for the Form Template: Student Survey
- Create Possible Answer records, Next Questions for each, and set your Default Next Question:
- Repeat this process until the list of Question Templates has only 1 First Question marked, and the possible Form Complete options have no Default Next Question populated.
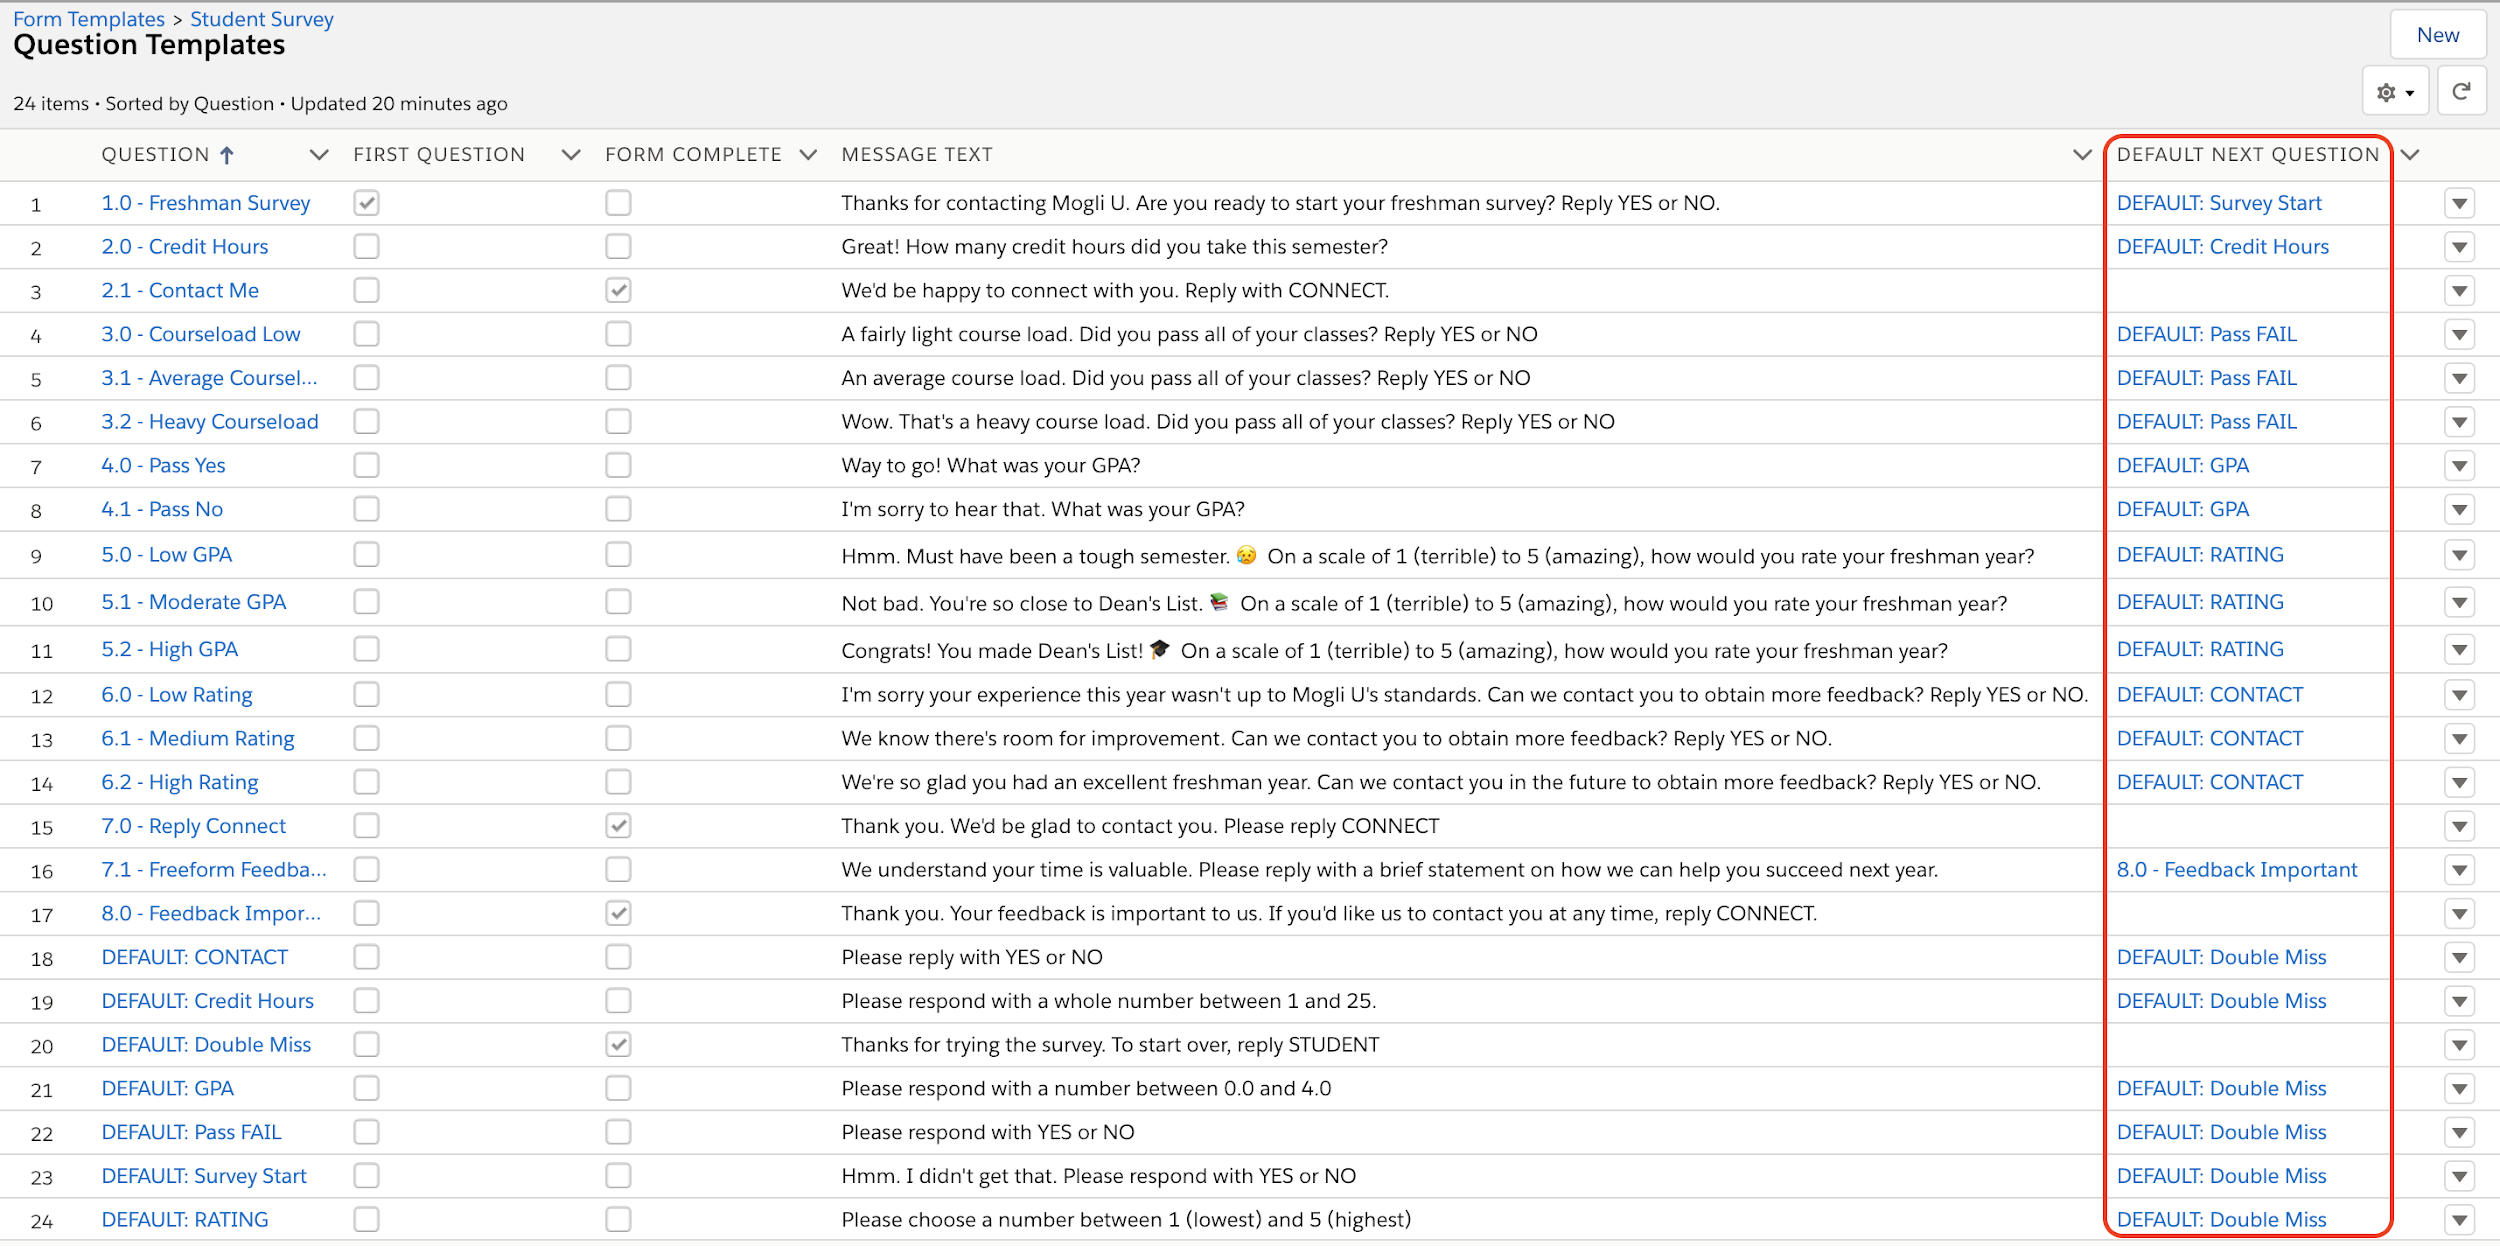
An ordered list of Question Templates, complete with Default Next Questions
- Click on the Form Template name (Student Survey) to be taken back to the Form Template record, and set the Status to Active.
- Copy the text from your First Question.


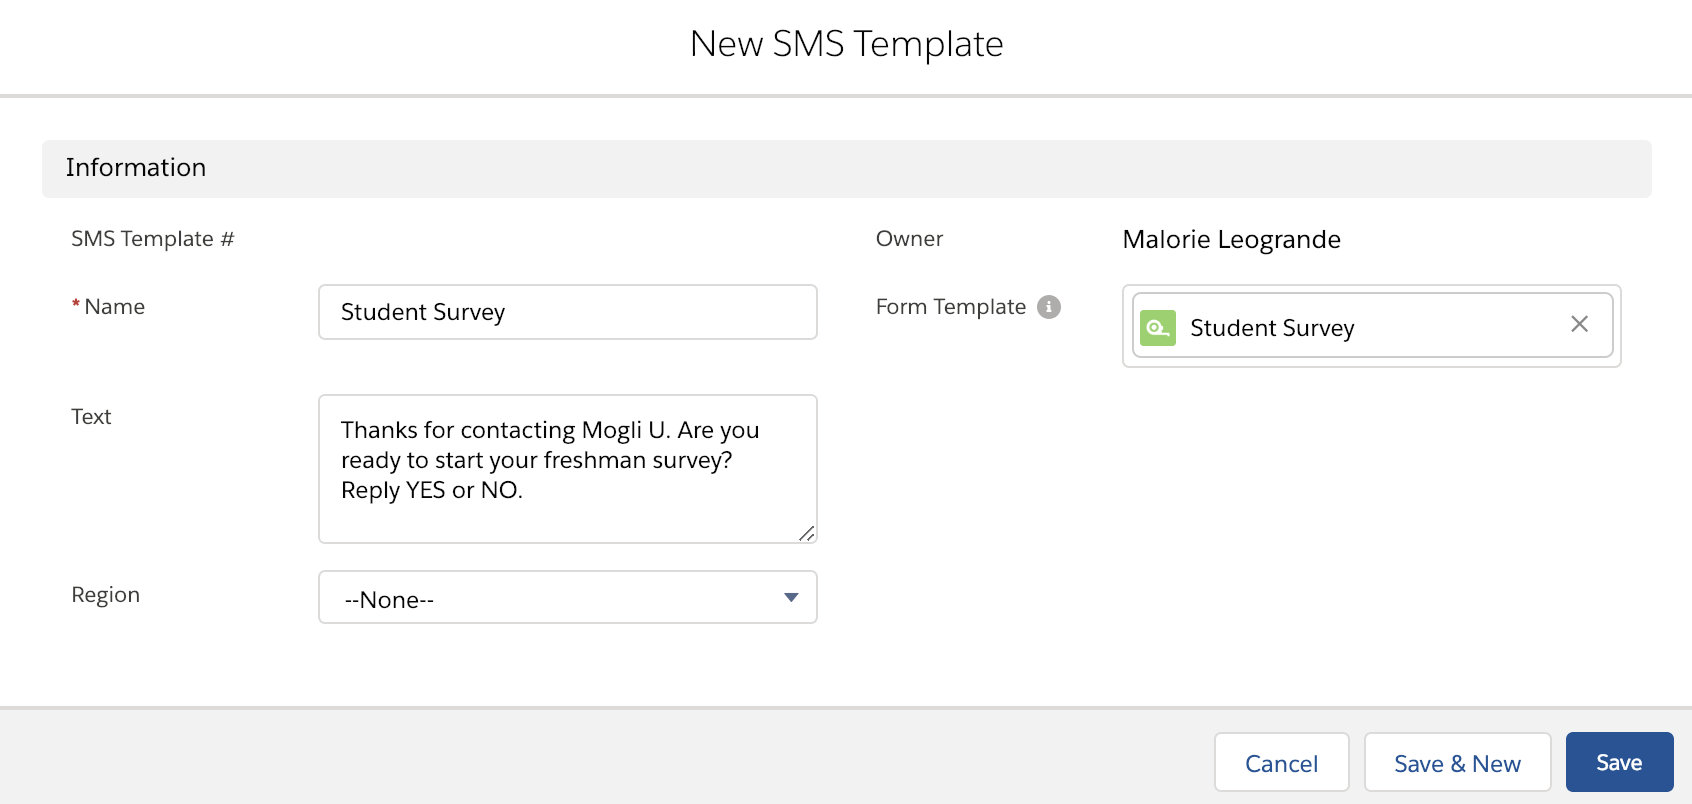
Create an SMS Template
- Click the SMS Template tab and click New

- Name the SMS Template the same as your Form Template.
- Leave the Text field blank, and it will auto-populate with the text of your first question.
- Attach the appropriate Form Template, and do not select a region. Save.


Text and Contextualize
- Using your personal cell phone or messaging service, text in the word STUDENT (or your chosen Query String) to one of your Gateways (phone numbers).
- As you answer each question, you should be taken to the next as you’ve ordered it.
- Double-check that your Default Next Questions and Default Double Miss’s trigger as expected.
- Ask a few members of your team to test as well. This will help imitate the variety of responses you might find when the Form Template goes live.
Test 1 Test 2 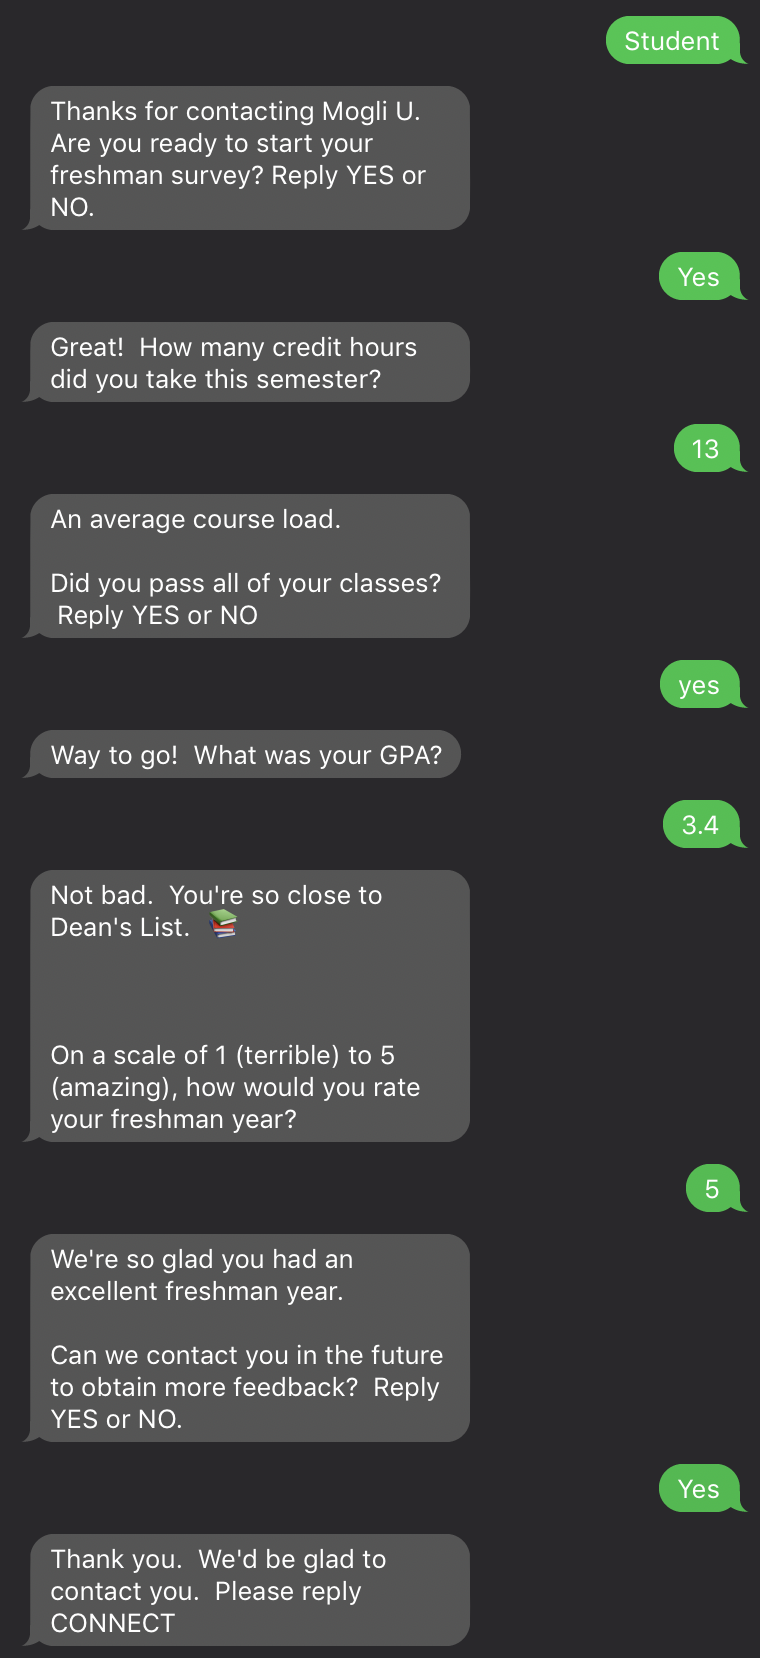
- Check to see that your responses are properly stored in the Forms object. Navigate back to the Form Template tab, and select the Form Template you’ve just tested. Notice that there’s now a record stored in the Forms object and that the Status reads ‘Complete.’ If the status still reads ‘Active,’ your recipient began answering the questions, but didn’t make it all the way through.
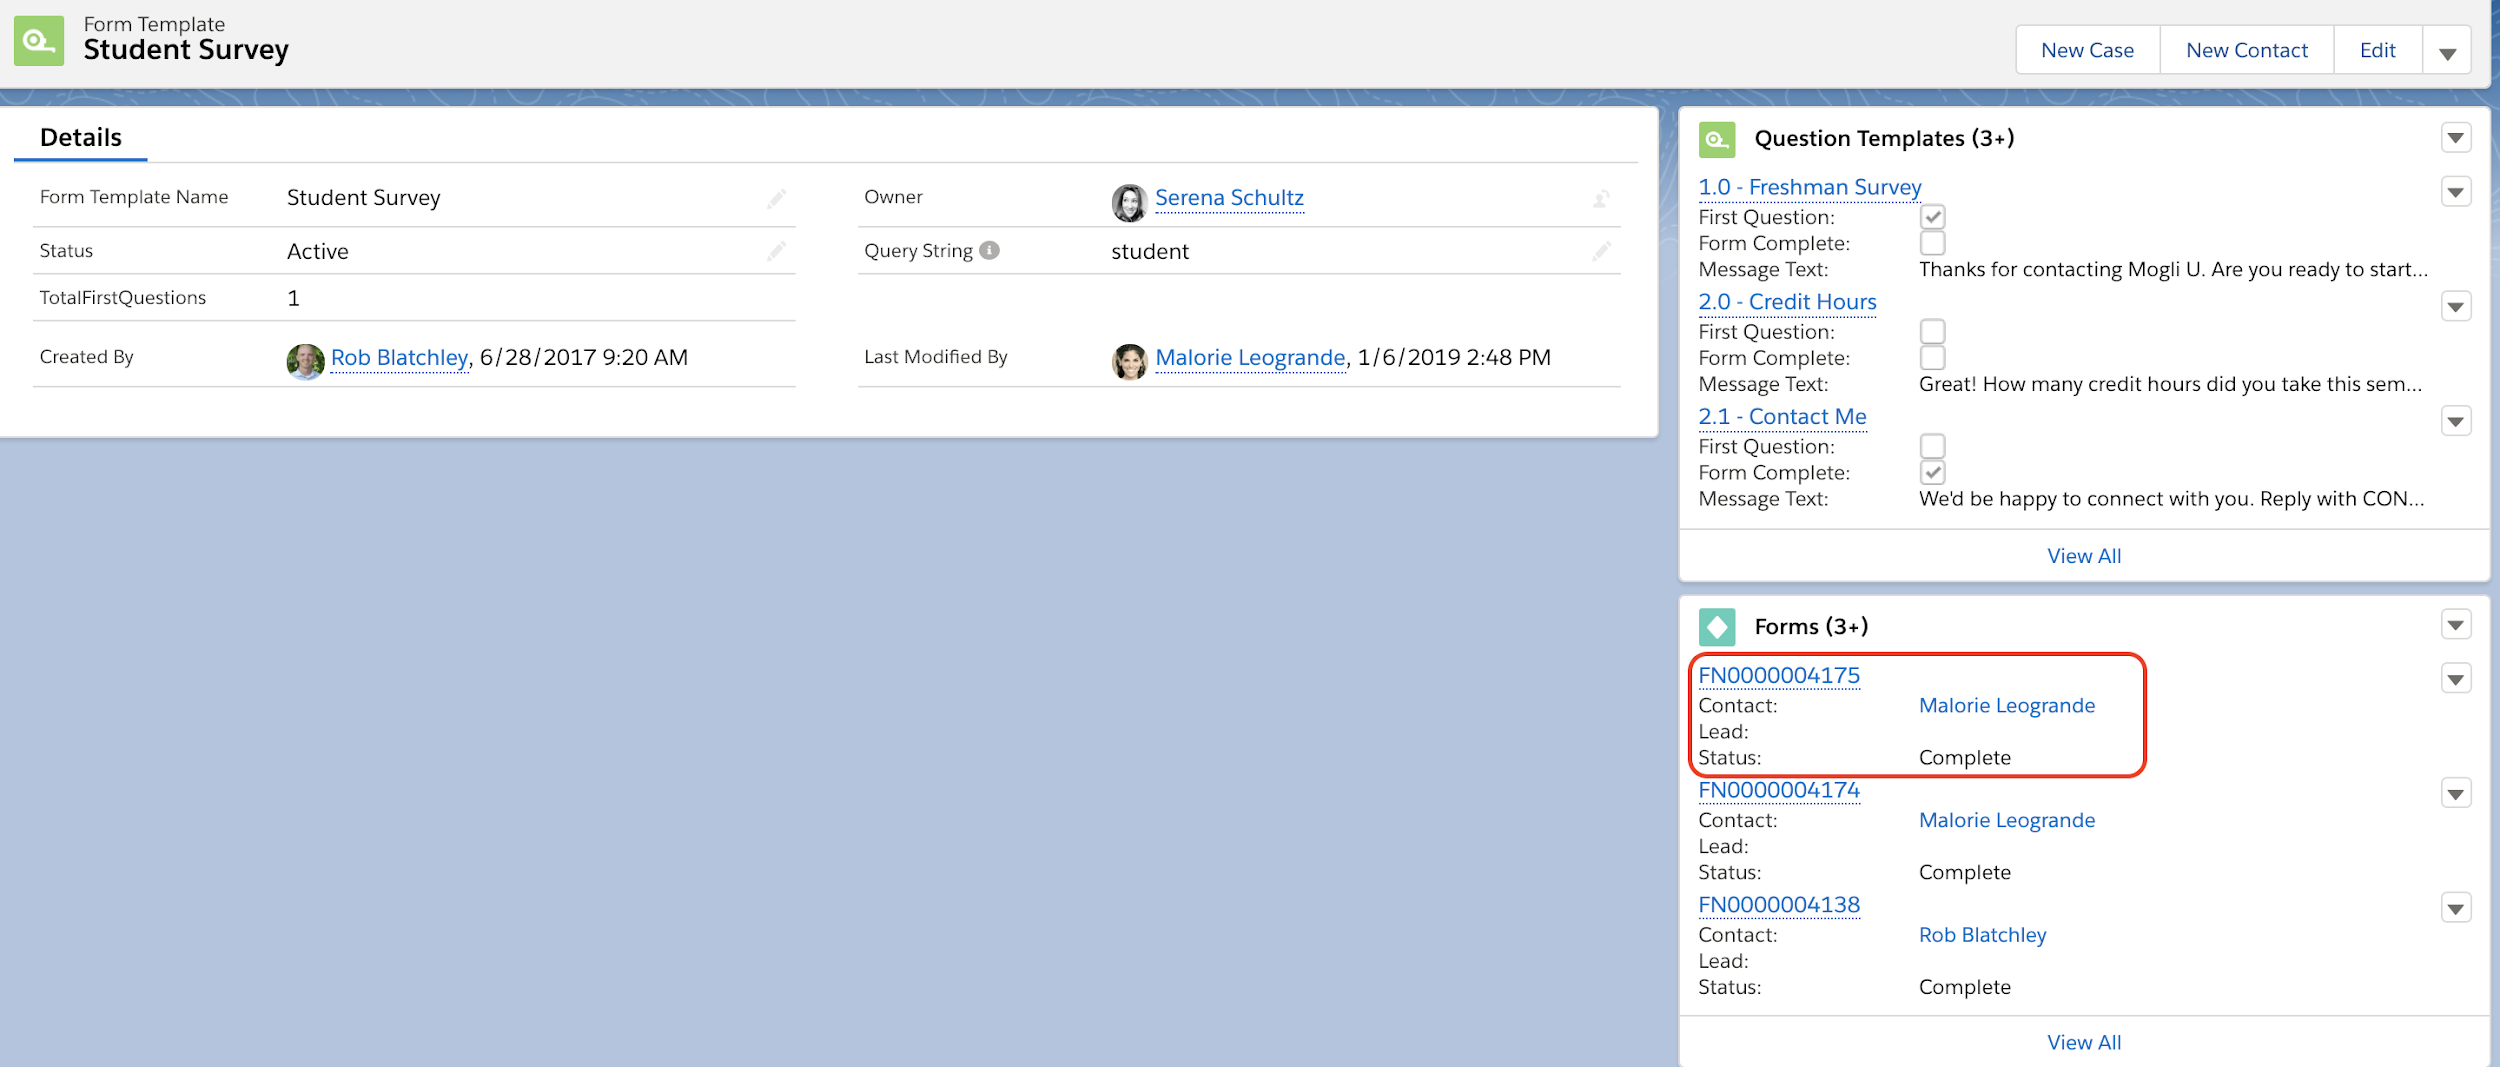
A newly-created Form as stored on the Form Template object
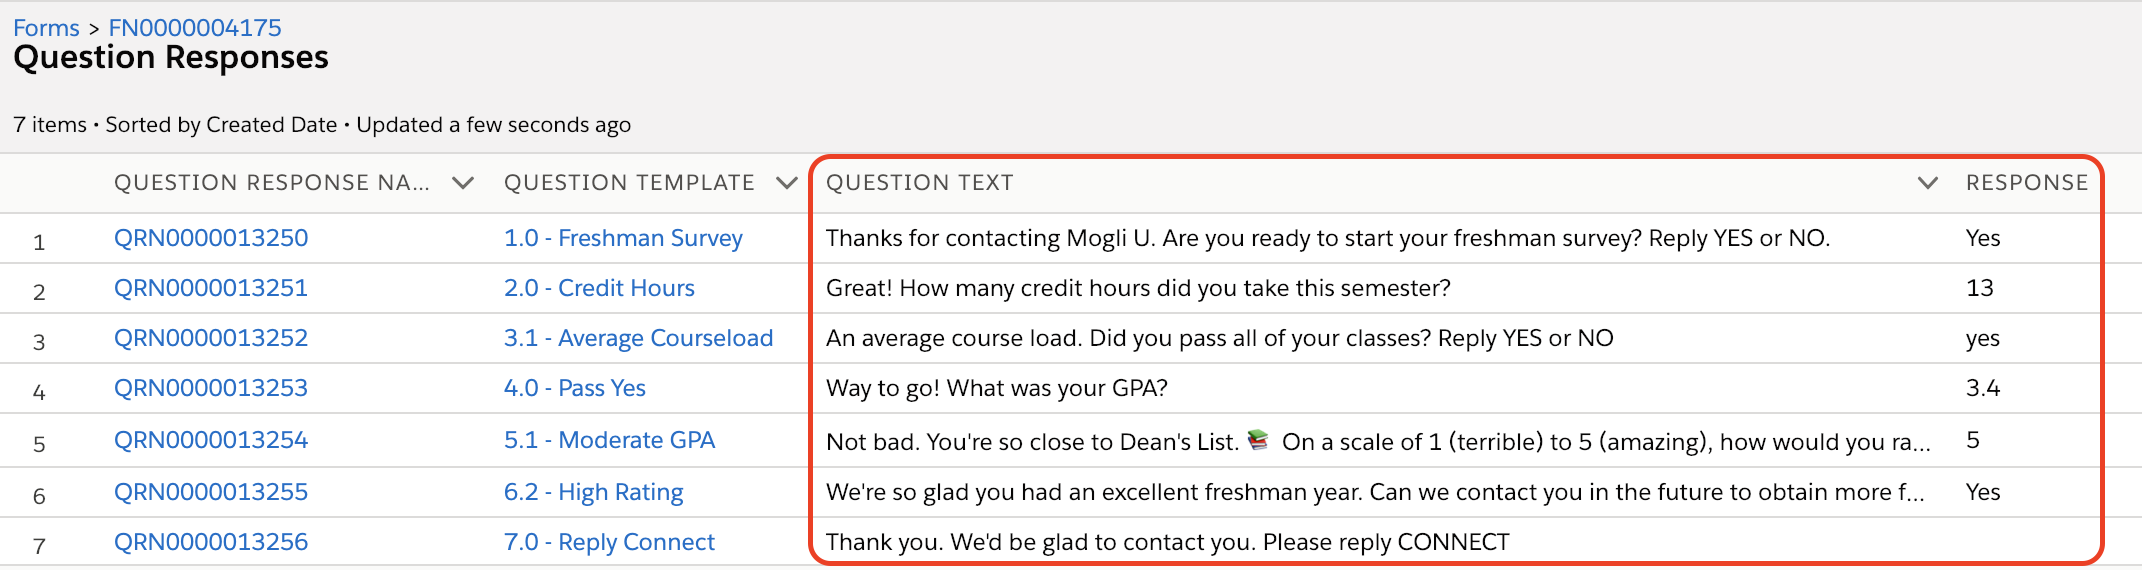
- Click on the Form Number (starts with ‘FN’), and click View All in the Question Response object:
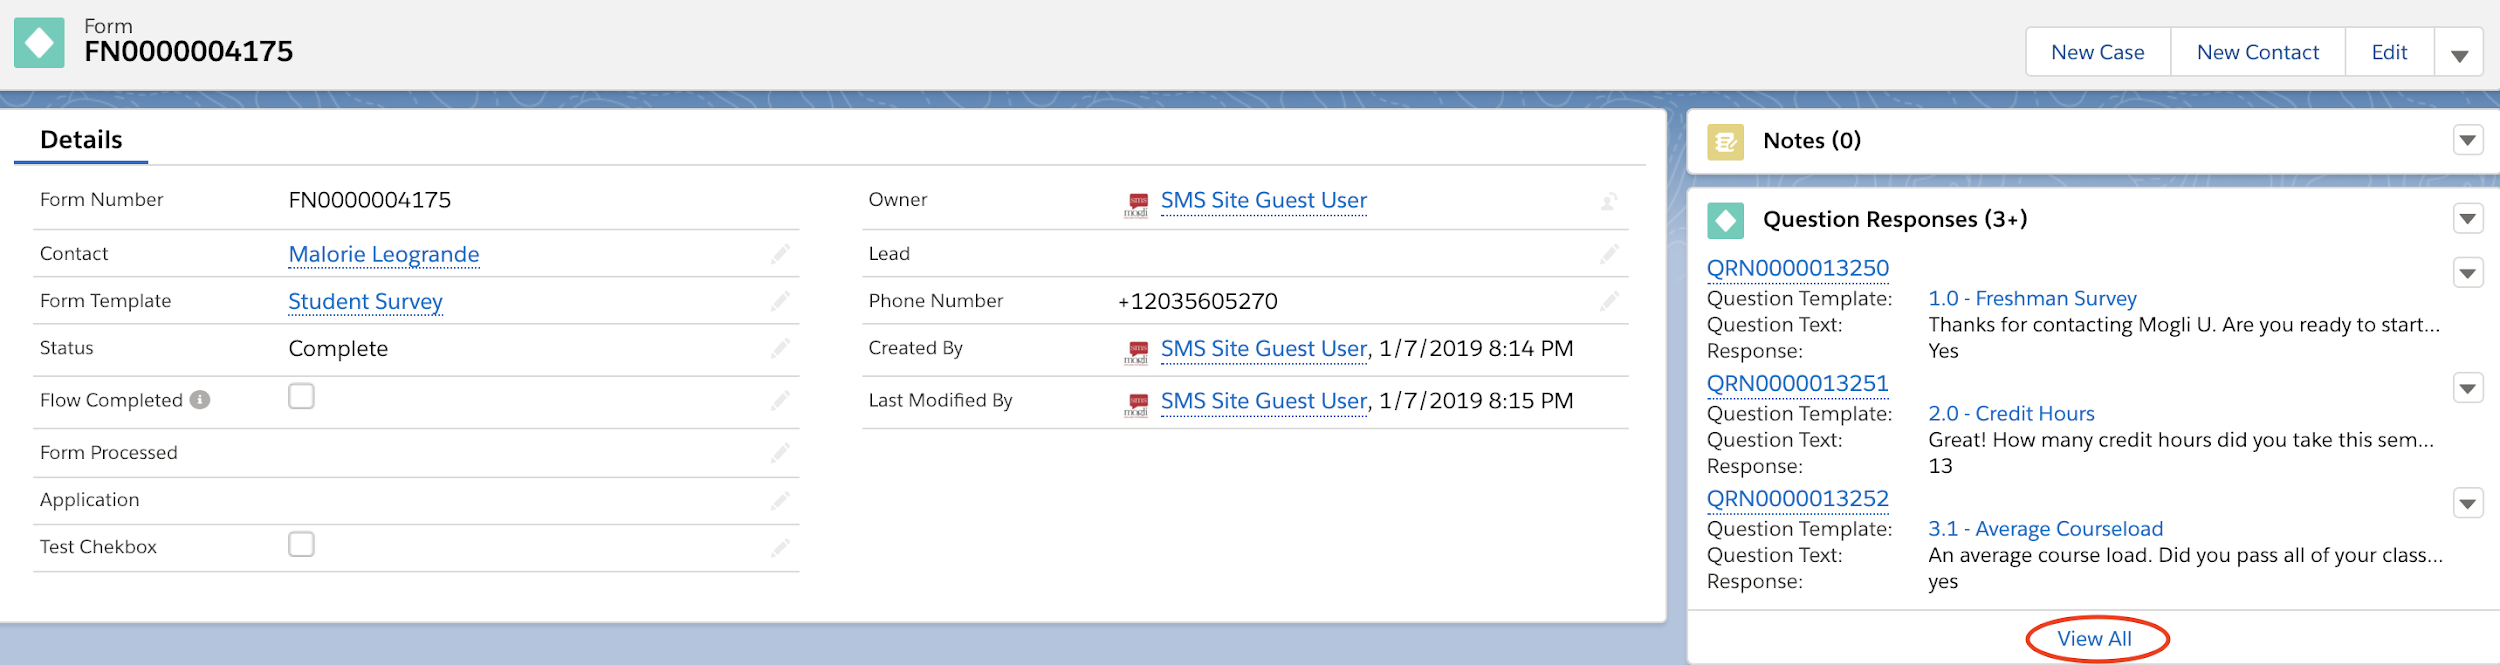
The Form record
- Here, you’ll find the responses to the questions asked in the Form Template you just tested:
- Navigate to your Contact record. You’ll see the conversation in Conversation View. The SMS Site Guest User is the message sender for all Form Template conversations.
- Open the Related tab. You’ll see your newly-created Form record in the Forms Related List:
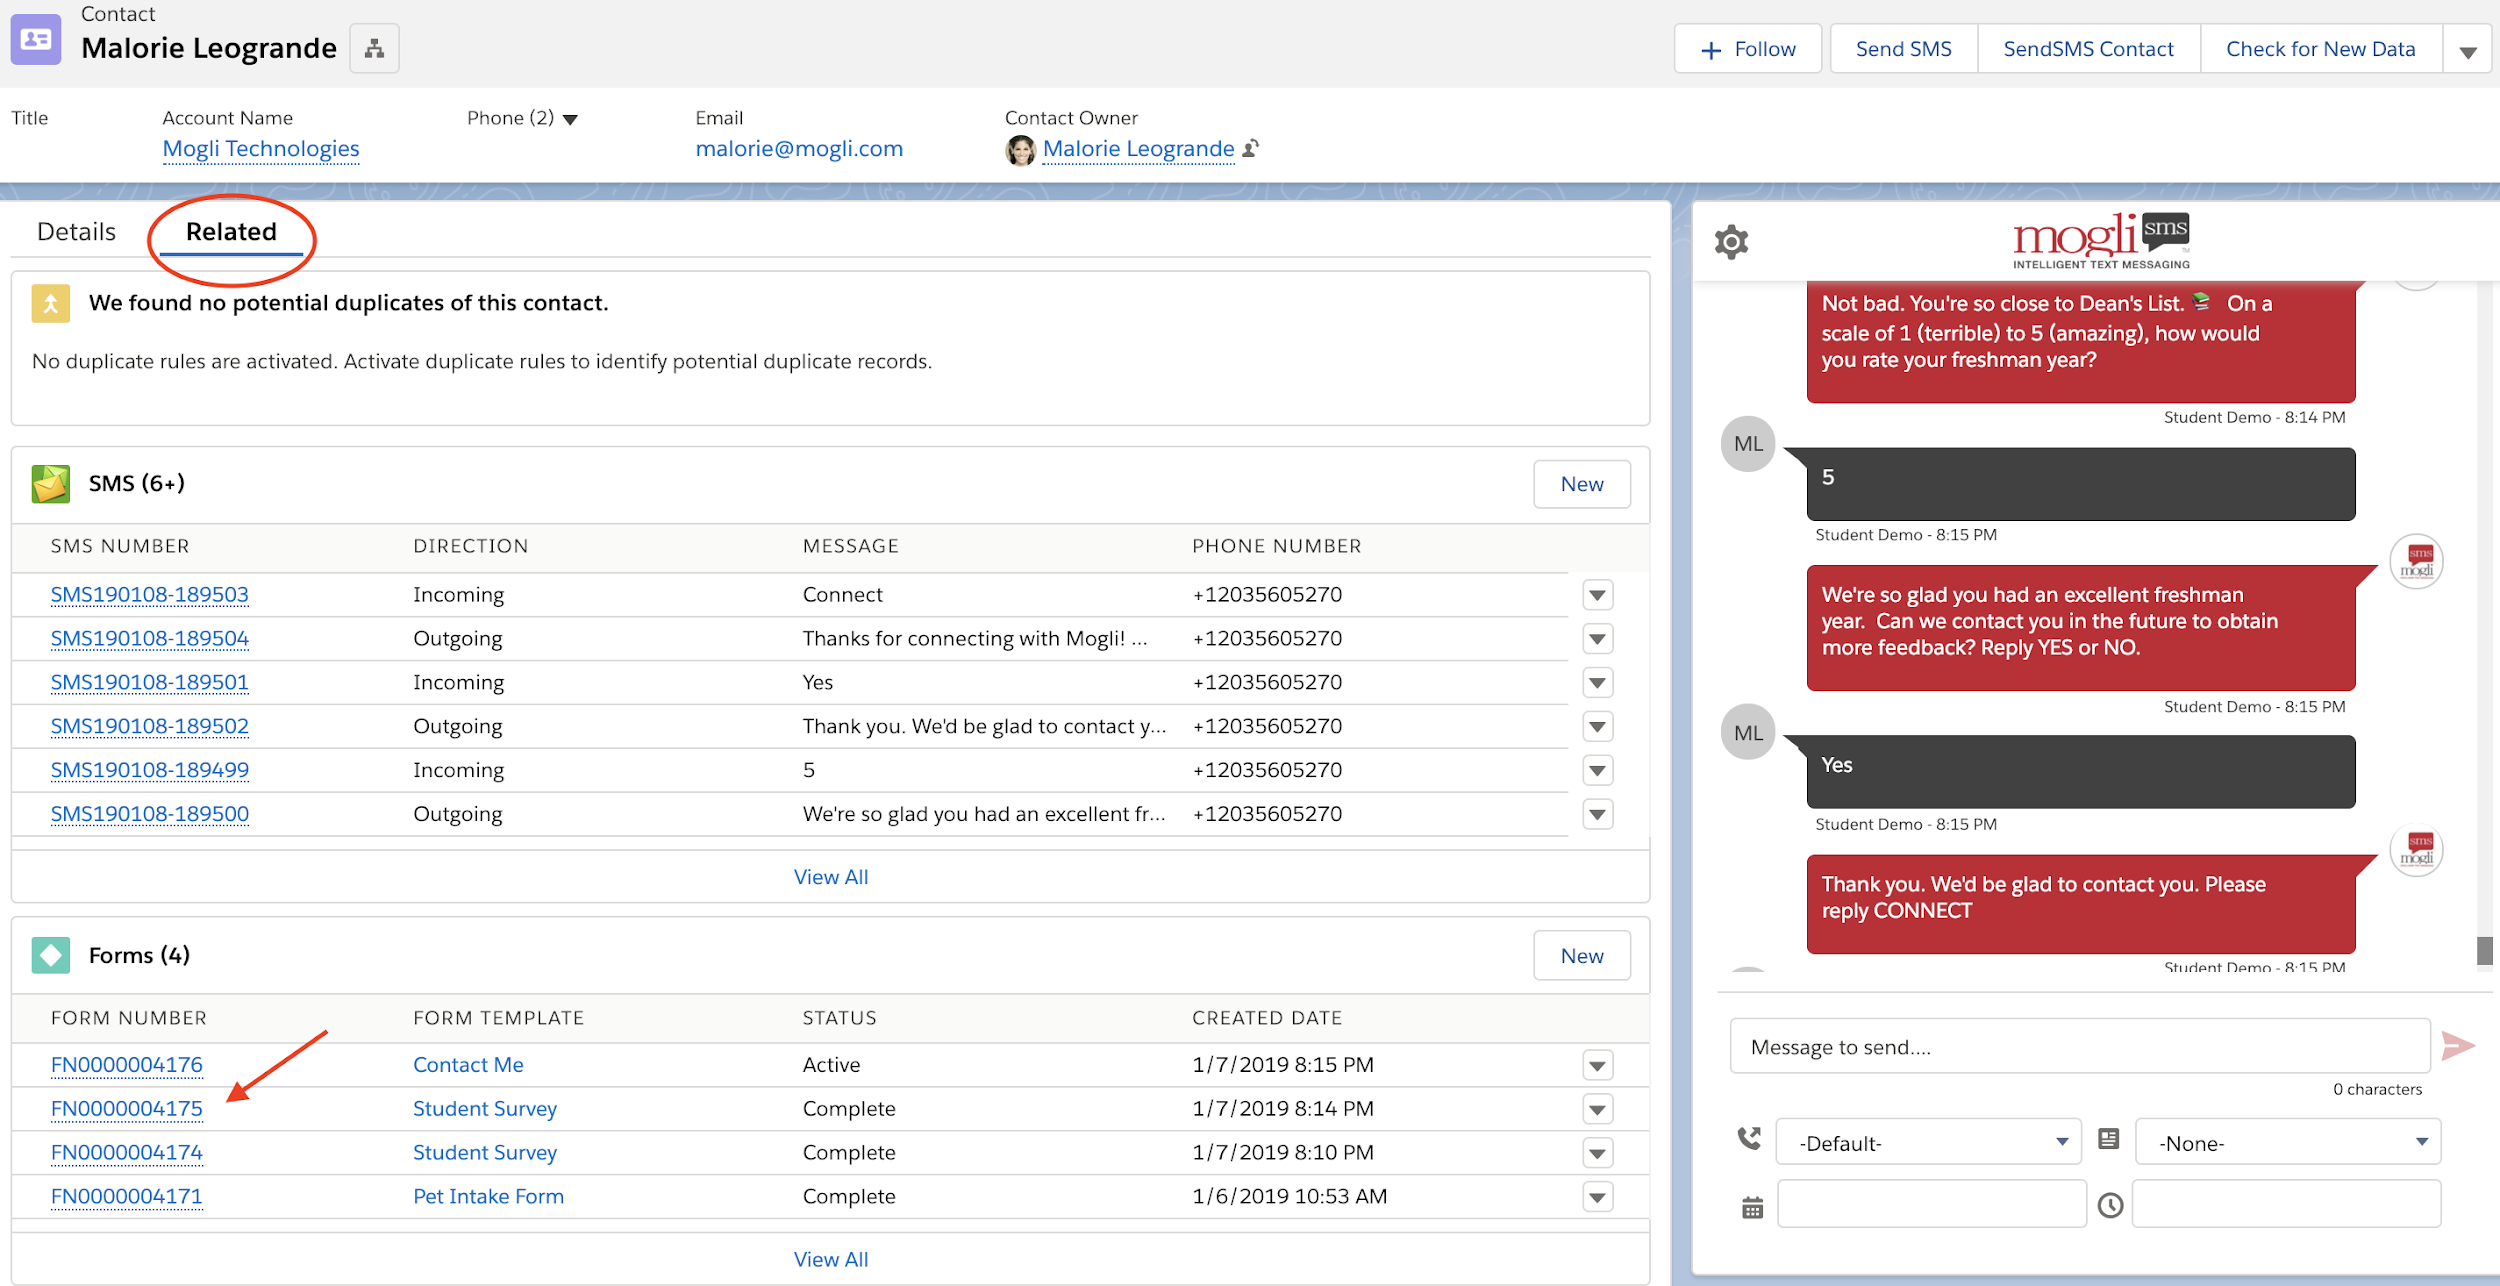 A Contact record with evidence of engagement with a Form Template, as well as the Form record in the Forms Related List


Since all Form Templates must be connected to an SMS Template, you can easily initiate the Form Template with an outgoing message by sending its accompanying SMS Template in Conversation View or within a bulk message via the Bulk SMS tab.
Was this article helpful?